




What Is Login & Register Forms With OTP?
Login & Register Forms With OTP is a complete authentication system inside Classic Monks. It adds a dedicated Classic Monks > Login submenu where you configure every aspect of the inline forms, OTP delivery, and integration options.
The system generates frontend login, registration, and password-reset forms that you can place anywhere with a shortcode, or configure to replace the default WordPress wp-login.php and the WooCommerce My Account login. OTP codes are delivered by phone through Twilio, Firebase Authentication, or a custom SMS endpoint, or by email using the WordPress or WooCommerce email template engine. Users can also sign in with a password, and the system hands off to the Classic Monks 2FA challenge when that security feature is enabled for the user.
Why You Need It
The default WordPress login screen works for basic sites but falls short for modern use cases:
- Passwordless login: users prefer a one-time code sent to their phone or email over remembering complex passwords
- Registration verification: OTP confirms the phone number or email is real before creating an account, which reduces spam registrations
- WooCommerce checkout: verify a customer’s phone during checkout for delivery confirmation and fraud prevention
- Custom branding: match the login experience to your site’s look and feel instead of the standard WordPress login page
With Classic Monks you get all of this in one feature, with no third-party plugin dependency beyond the OTP provider itself.
Recommendations Before Enabling
- Have an SMS provider ready. Phone OTP needs a Twilio account (SID, Auth Token, and a verified sender number), a Firebase project (API key and web config), or a custom HTTP gateway you can point at. Store the credentials before you enable the feature.
- Decide the email path. Email OTP uses either the WordPress or WooCommerce email template engine. If your site depends on reliable email delivery, configure an SMTP plugin first.
- Check WordPress registration. The registration form only works when WordPress allows registration. Confirm Settings > General > Membership > Anyone can register is enabled.
- Check for conflicts. The Custom Login URL security feature can rewrite or redirect
wp-login.phpindependently. If you plan to replace the default login, decide which feature owns thewp-login.phpsurface to avoid a conflict.
How to Enable Login & Register Forms With OTP
Step 1: Open the Classic Monks Settings
Click Classic Monks in your WordPress admin sidebar.
Step 2: Go to the Core Tab
Click the Core menu.
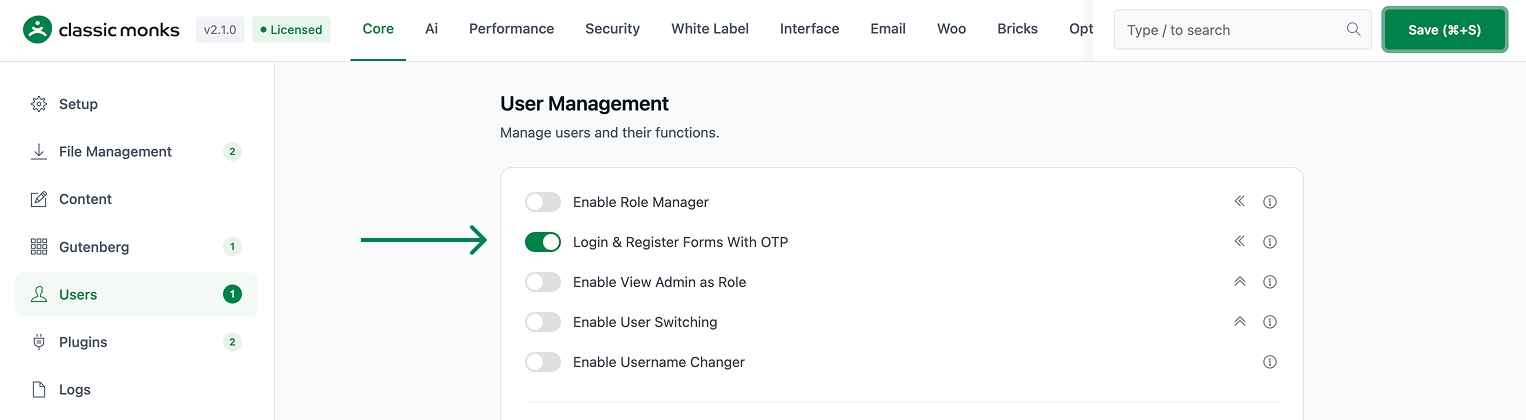
Step 3: Open the Users Subtab
Click the Users subtab in the left sub-navigation.
Step 4: Enable the Feature
Toggle on Login & Register Forms With OTP. The toggle shows a submenu indicator (the « icon) that signals it adds a new submenu to the admin sidebar.
Step 5: Save and Reload
Click Save Changes, then reload the page. A new Login submenu appears under Classic Monks in the admin sidebar.
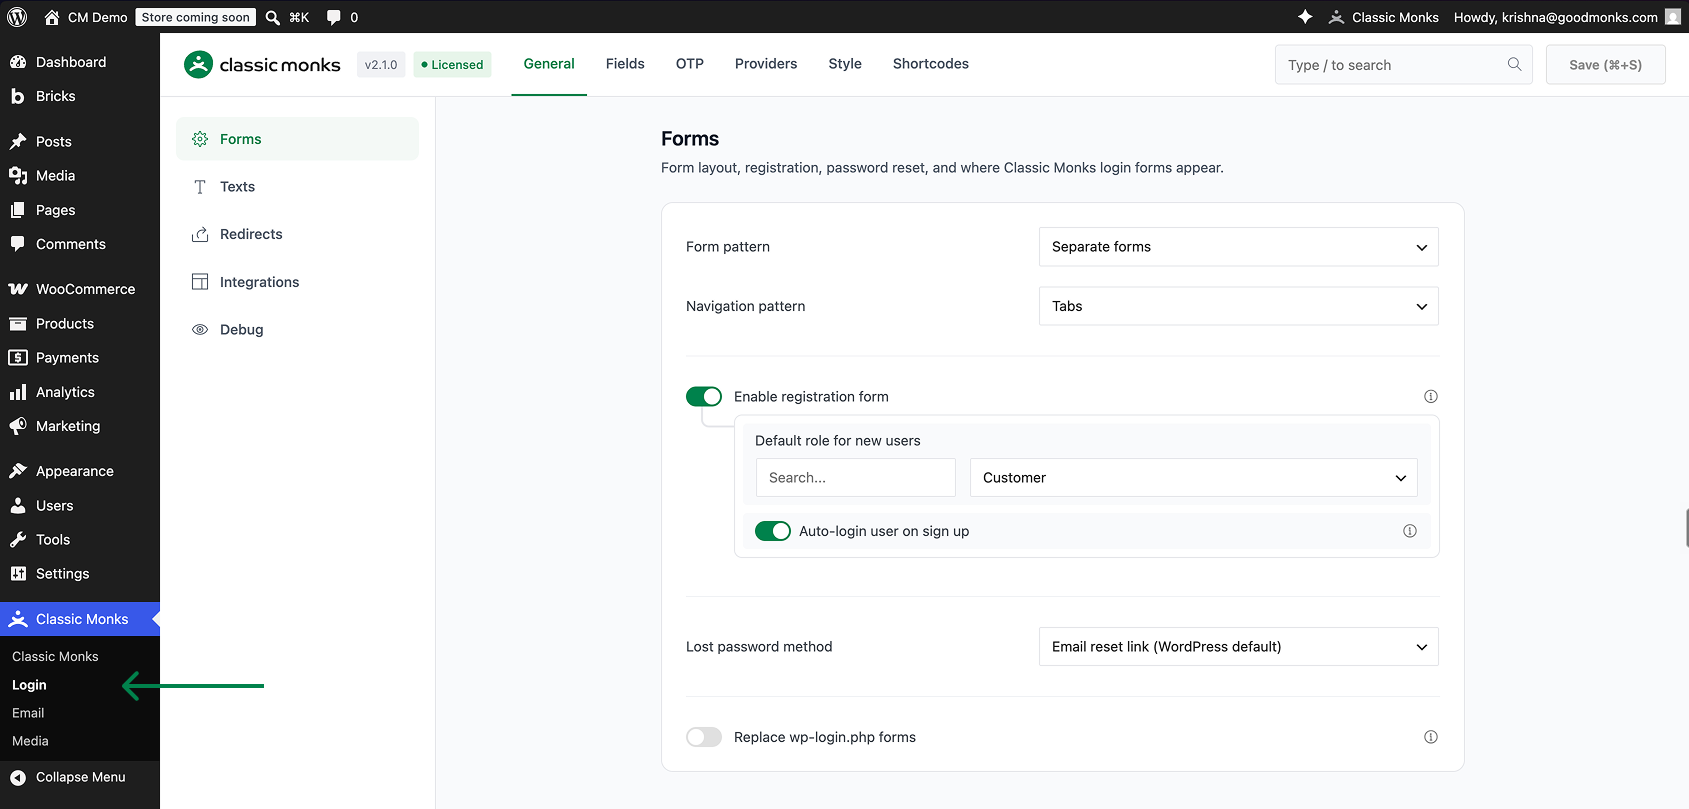
Step 6: Open the Login Settings
Click Classic Monks > Login to open the settings page. Six tabs are available: General, Fields, OTP, Providers, Style, and Shortcodes.
Configure Options
General Tab
The General tab has five subtabs: Forms, Texts, Redirects, Integrations, and Debug.
Forms controls the layout, registration, and surfaces:
| Option | Description | Default |
|---|---|---|
| Form Pattern | Display login and register as separate forms or a single field (email first) | Separate |
| Navigation Pattern | Tabs, footer links, or no navigation between forms | Tabs |
| Enable Registration Form | Allow new users to register via the form | On |
| Default Role for New Users | Role assigned to new registrations | Subscriber (Customer if WooCommerce active) |
| Auto-Login User on Sign Up | Log the user in right after registration | On |
| Lost Password Method | Email reset link, email verification code + set new password, or disable | Email reset link |
| Replace wp-login.php Forms | Use the Classic Monks form instead of the default WordPress login screen | Off |
Texts customizes every button label and form heading, including the Login and Register tab labels, the Sign in and Sign Up buttons, the reset password button, and the intro text above each form. You can use {icon} in a tab label to show a default icon.
Redirects sets custom redirect URLs after login, registration, and logout. Leave them blank to send users to the site home. The Success endpoint toggle appends login=success or register=success to the redirect URL after a successful action.
Integrations controls the WooCommerce surfaces. It appears only when WooCommerce is active. You can replace the My Account login form, show a guest login form on checkout, and edit the shortcodes used on those pages.
Debug enables developer helpers for troubleshooting the frontend forms. It is visible only to administrators.
Fields Tab
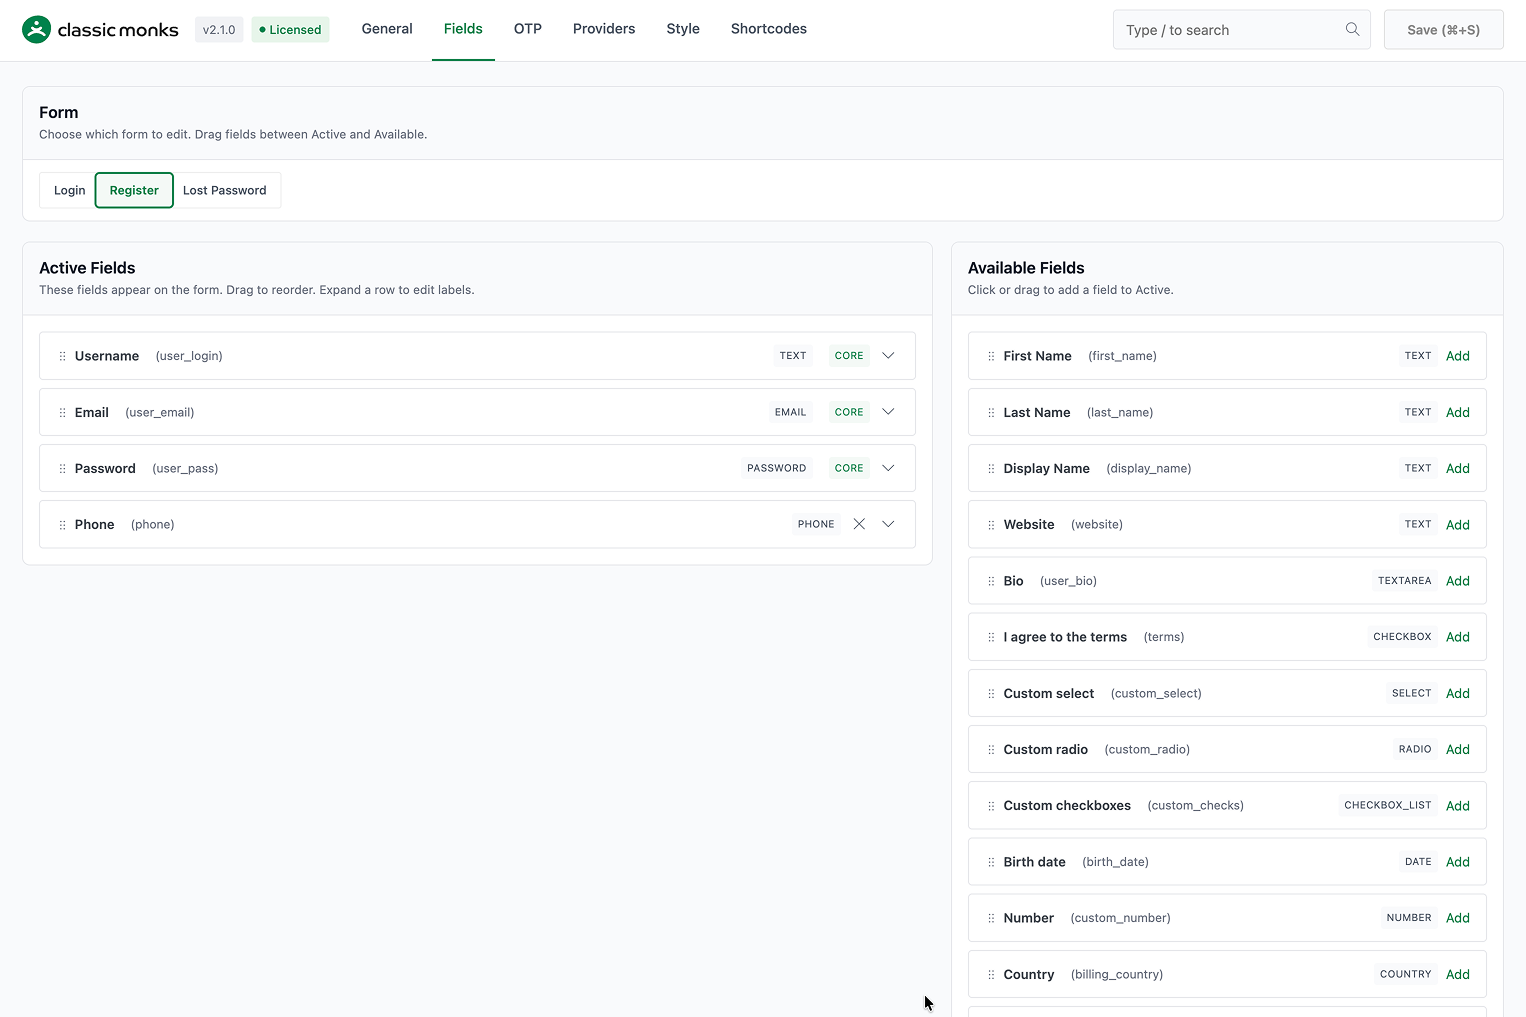
The Fields tab is a drag-and-drop field builder. Choose a form (Login, Register, or Lost password), then drag fields between the Active and Available lists. You can add text, email, password, phone, and other field types, mark fields required, set labels and placeholders, and add CSS classes. Core fields such as the username and password are marked as core and should not be removed.
OTP Tab
The OTP tab has five subtabs: Login Methods, Limits & Templates, Phone & Countries, Email OTP, and, when WooCommerce is active, WooCommerce Checkout.
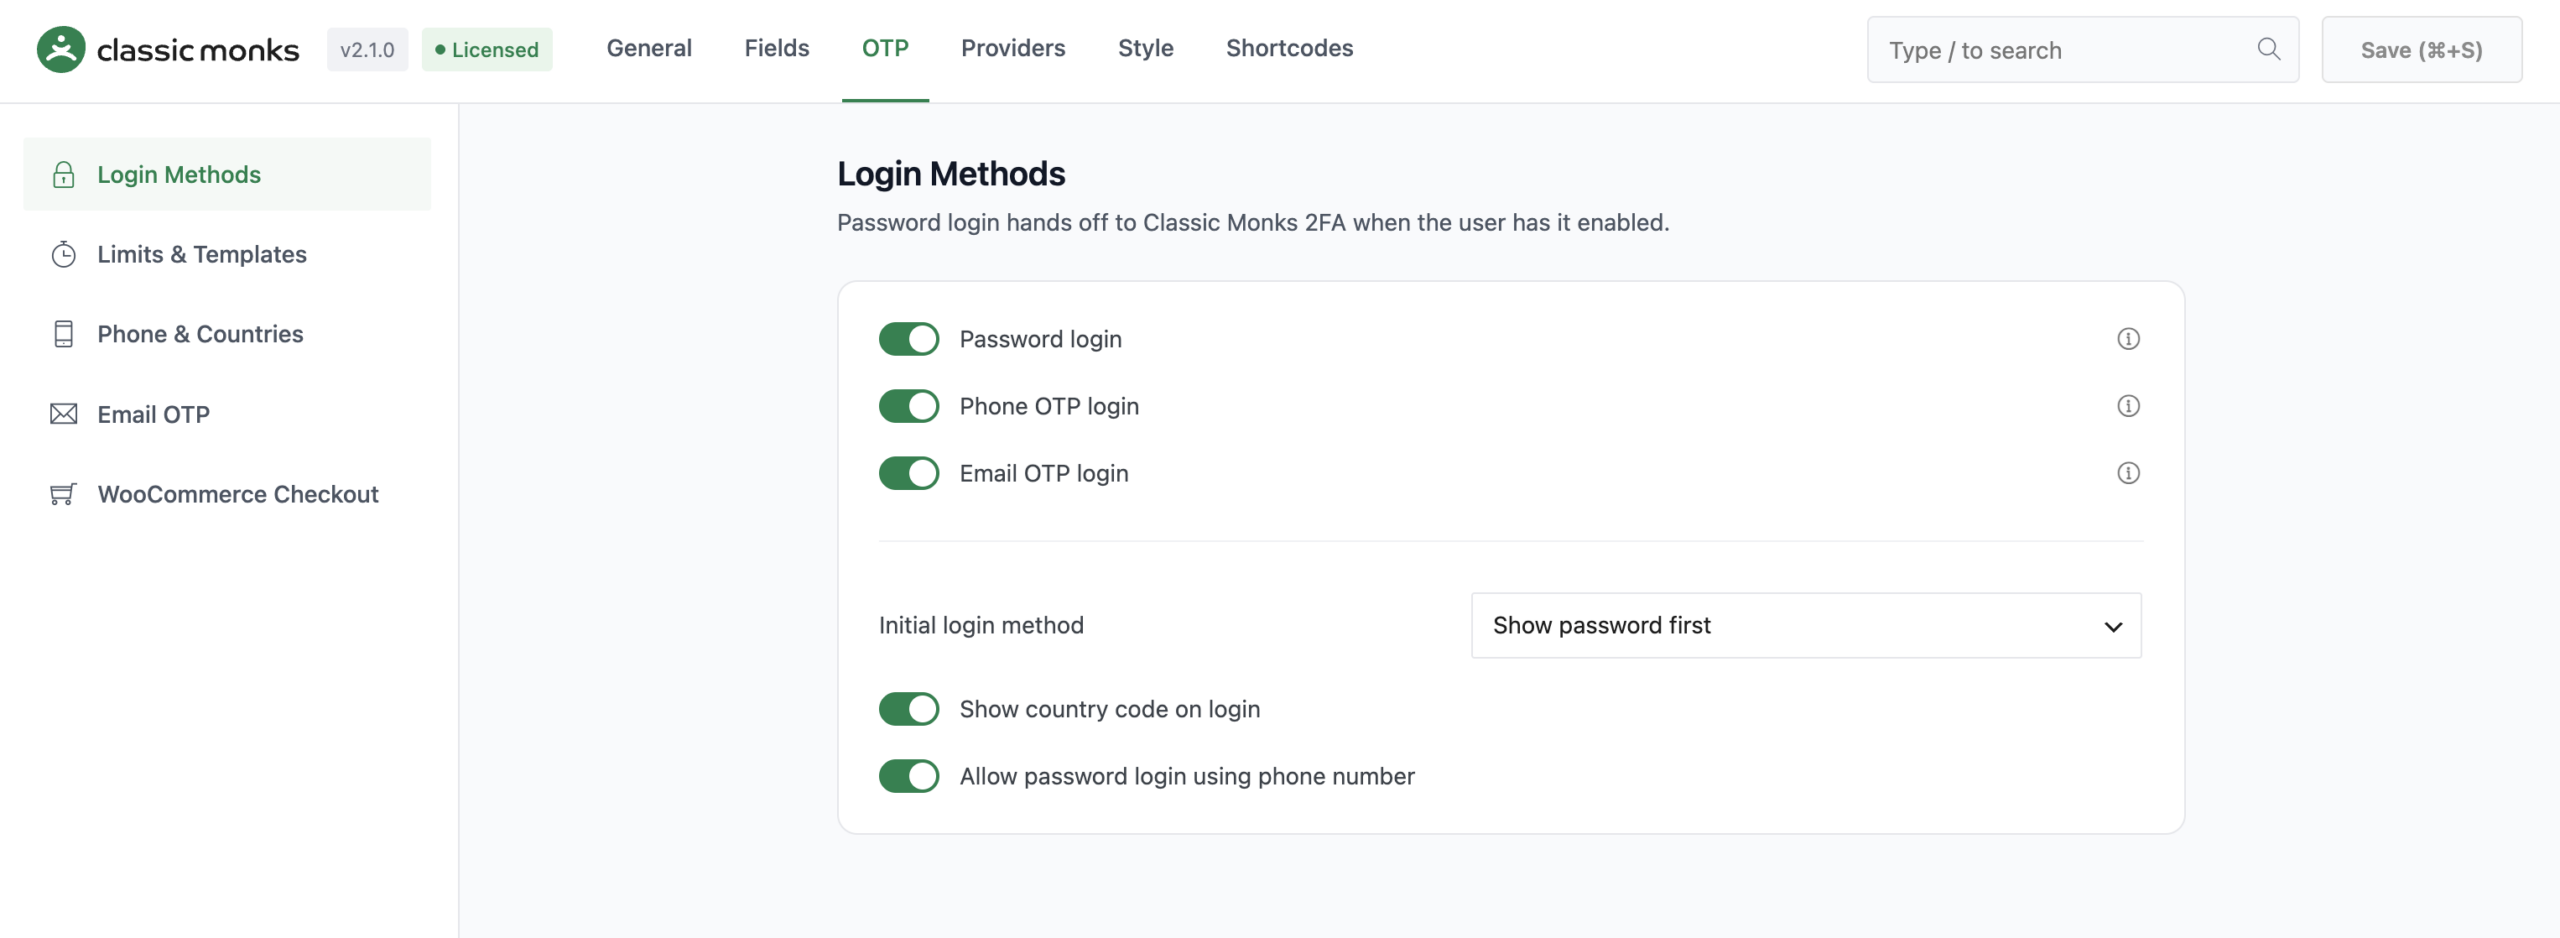
Login Methods controls how users sign in:
| Option | Description | Default |
|---|---|---|
| Password Login | Allow sign-in with a username and password; hands off to Classic Monks 2FA when enabled | On |
| Phone OTP Login | Send a one-time code by SMS or WhatsApp | On |
| Email OTP Login | Send a one-time code to the account email | On |
| Initial Login Method | Show password first, or show OTP first (phone, else email) | Show password first |
| Show Country Code on Login | Display the country code selector on the login form | On |
| Allow Password Login Using Phone Number | Let users sign in with their phone number as the username | On |
Limits & Templates controls the OTP code itself:
| Option | Description | Default |
|---|---|---|
| OTP Digits | Code length (4 to 8) | 6 |
| OTP Expiry | Seconds a code stays valid | 600 (10 minutes) |
| Resend Limit | Max sends before a temporary ban | 8 |
| Incorrect Attempt Limit | Max bad verifies before a temporary ban | 10 |
| Ban Duration | Seconds a banned phone or email stays blocked | 600 |
| Resend Wait | Seconds between sends | 30 |
This subtab also defines the SMS body templates for login and registration, using the [otp] placeholder. When Firebase is the primary provider, the code is always 6 digits and the length and character type cannot be changed.
Phone & Countries configures the country code selector, the default country (based on geolocation or a fixed choice), the allowed countries list, and whether to strip a leading zero from local numbers.
Email OTP customizes the email subject, body, sender name and address, and the template engine (WordPress or WooCommerce). It also supports optional branding with a logo and footer.
WooCommerce Checkout (when WooCommerce is active) enables phone OTP verification at checkout, sets the checkout priority, and controls how the OTP phone relates to the billing phone field.
Providers Tab
The Providers tab has five subtabs: Providers, Twilio, Firebase, Custom, and Test SMS.
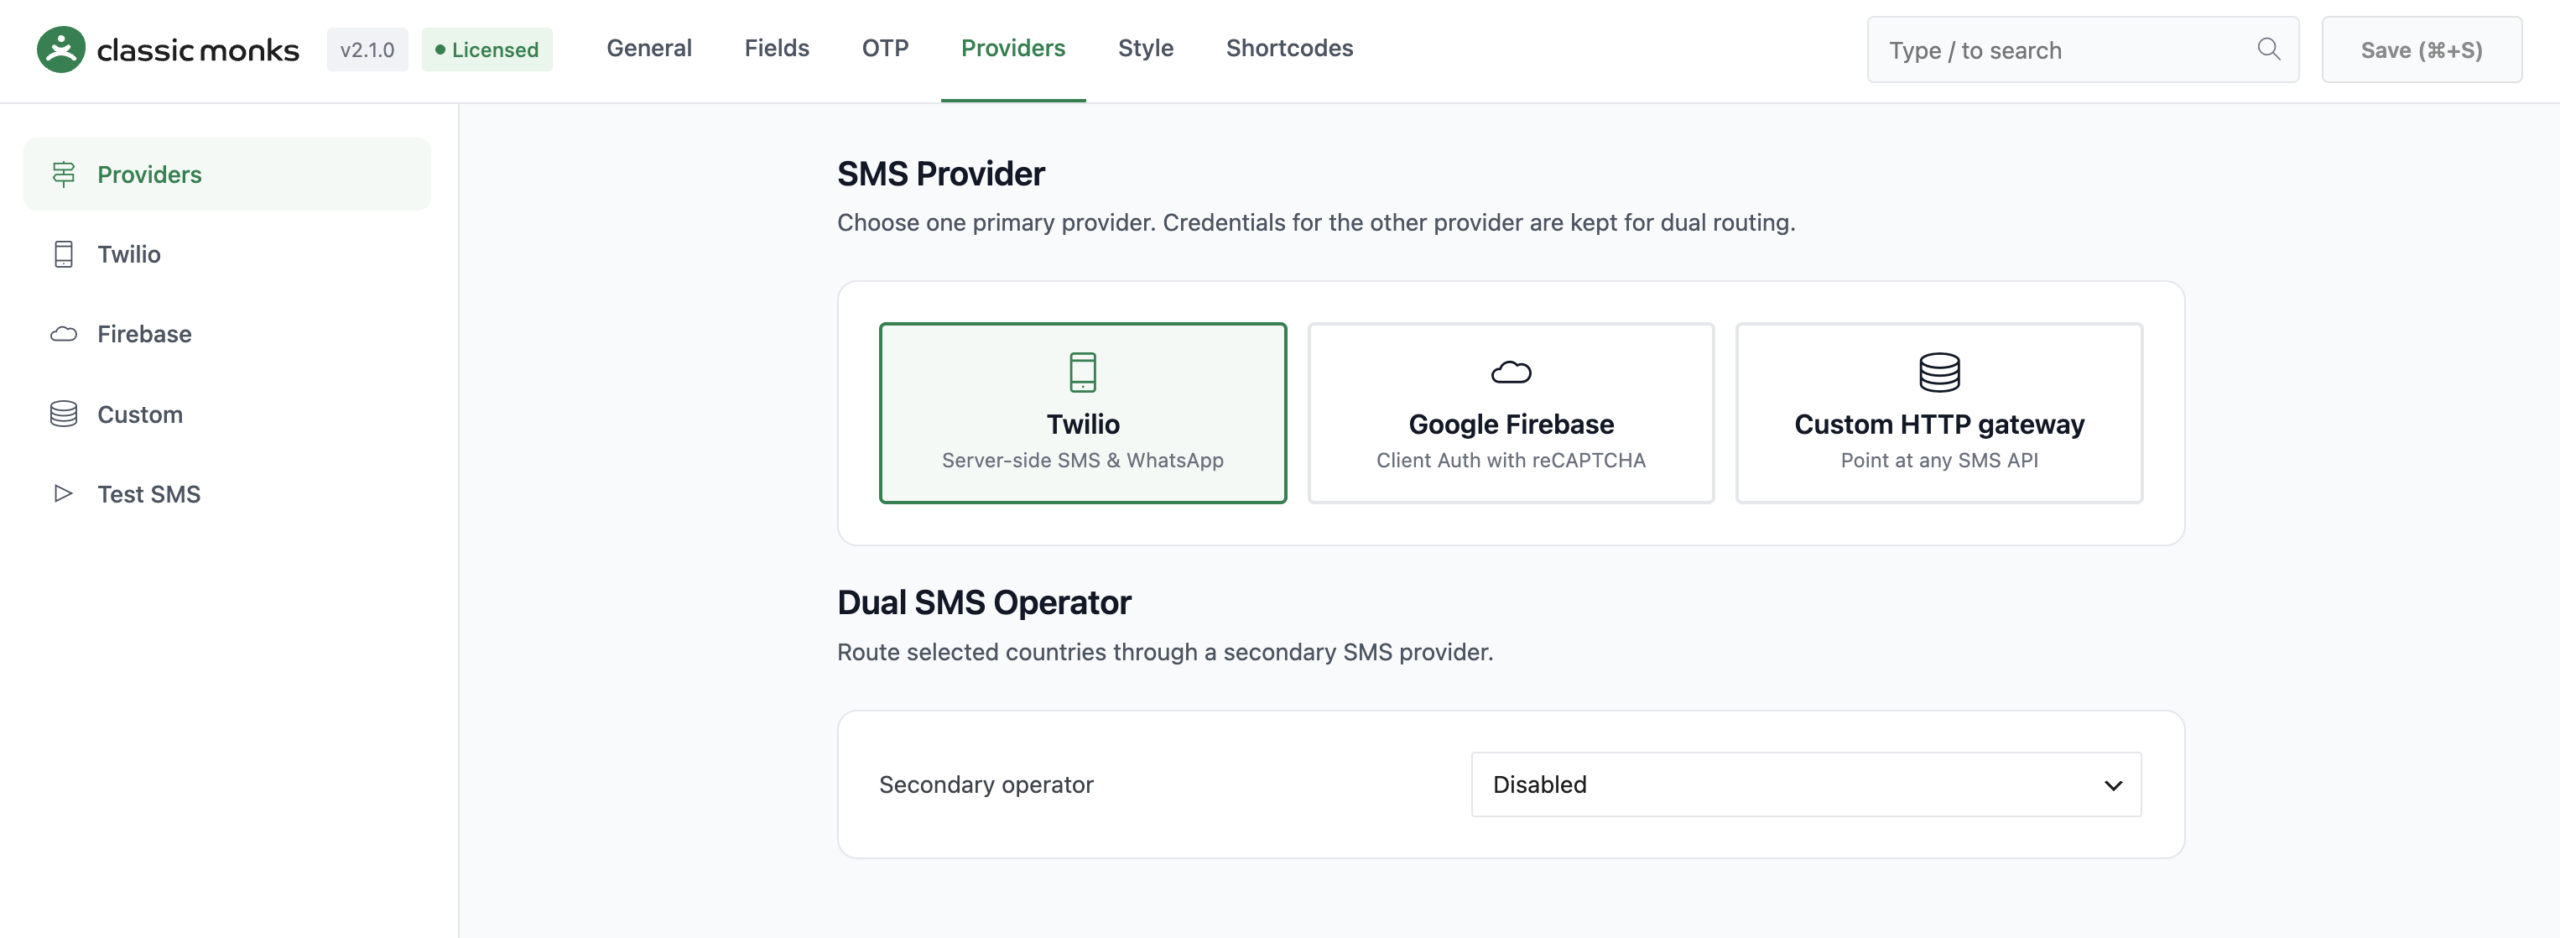
Providers is the routing surface. It shows the primary SMS provider selector (Twilio, Google Firebase, or Custom HTTP gateway) and the Dual SMS Operator settings, which let you route selected countries through a secondary provider. Set the secondary operator to off, use it for selected countries, or use it except for selected countries. This is where dual-operator routing is configured, not in the OTP tab.
Twilio holds the Account SID, Auth Token, and verified sender number, plus optional WhatsApp fields.
Firebase holds the Firebase API key and the web SDK config JSON for Firebase Authentication.
Custom points at any SMS HTTP endpoint. You configure the URL, HTTP method (POST or GET), request format (form or JSON), phone format, default country code, custom request body, and auth type (none, bearer, or basic).
Test SMS sends a test OTP to verify your provider configuration works before you rely on it.
Style Tab
The Style tab has four subtabs: Tabs & Method Options, Card & Buttons, Inputs, and Custom CSS.
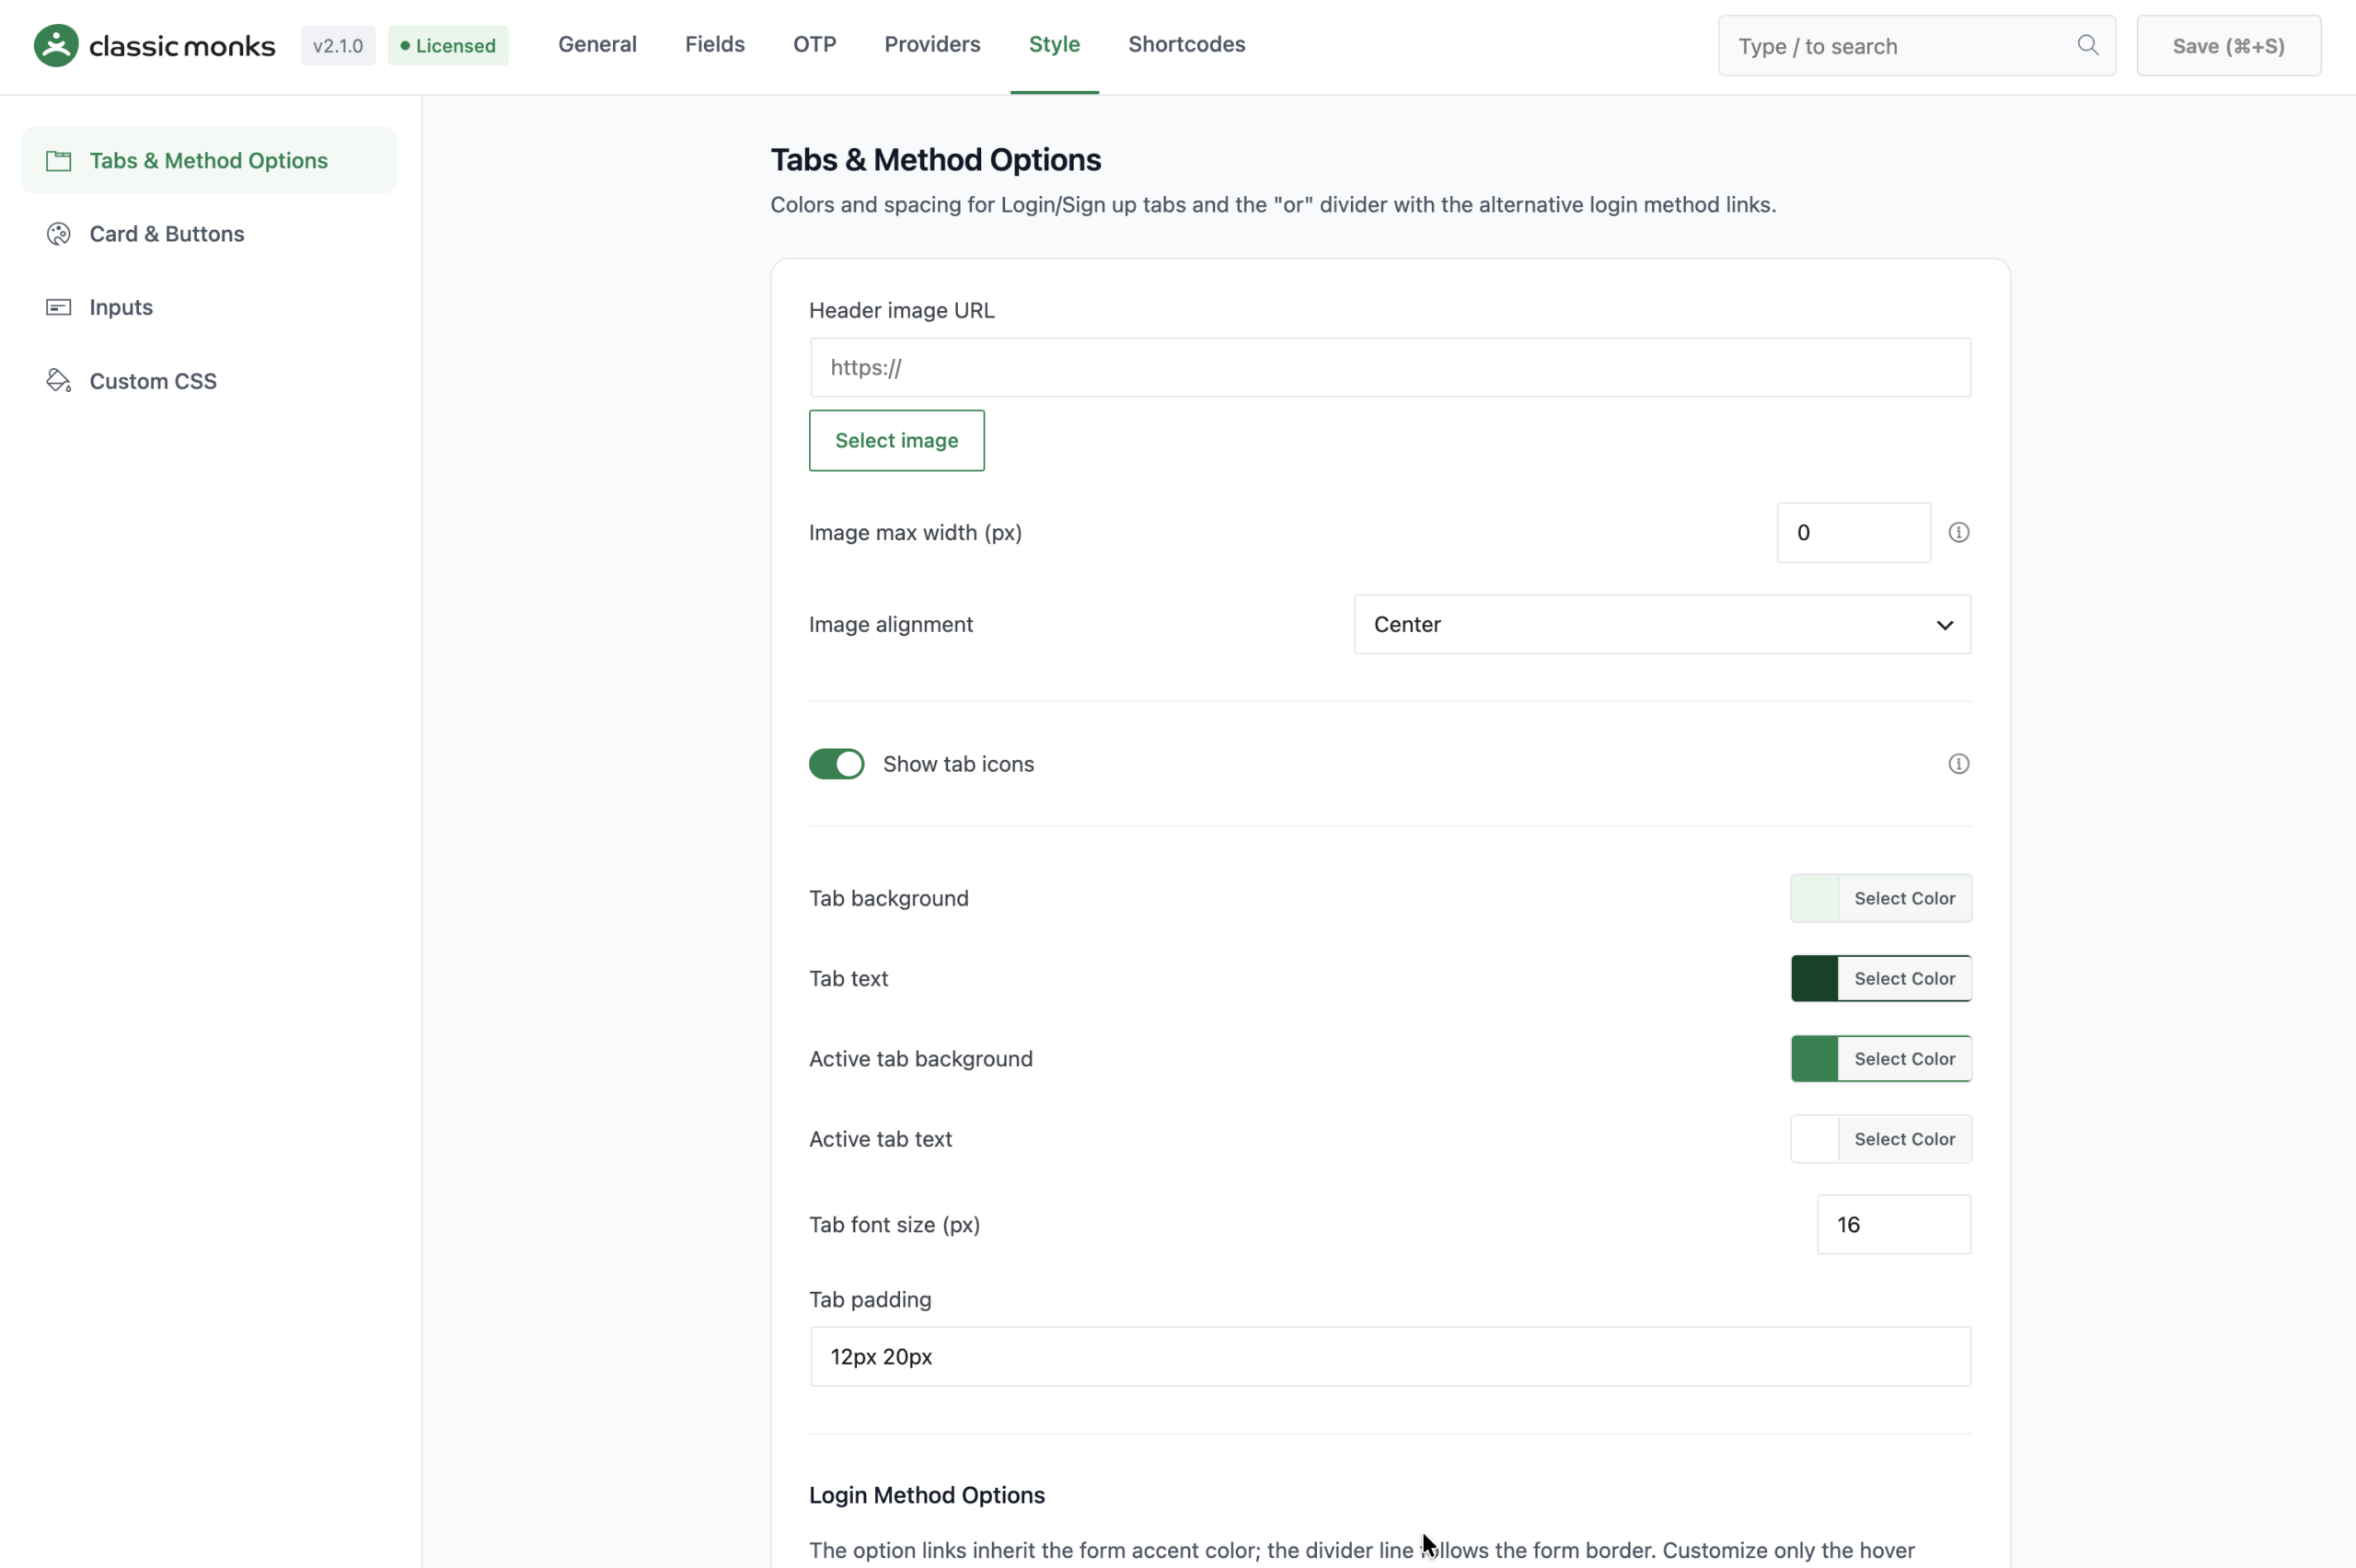
- Tabs & Method Options: colors for the form tabs and the method selection (active and inactive tab backgrounds and text, tab font size and padding), plus tab icon toggles
- Card & Buttons: form background, accent color, border radius and color, padding, max width, shadow, and the button colors
- Inputs: input height, background and text colors, border width and color, focus colors, field bottom margin, label and placeholder colors, icon color, and the OTP button colors
- Custom CSS: add any custom CSS for advanced styling
Place the Forms With a Shortcode
Use the [cm_login_form] shortcode to place forms anywhere on your site.
[cm_login_form active="login" forms="login,register,lostpw"]Attributes:
| Attribute | Values | Default | Description |
|---|---|---|---|
active |
login, register, lostpw |
login |
Which form is active on load |
forms |
Comma-separated: login,register,lostpw |
All enabled | Which forms to show |
pattern |
separate, single |
Global setting | Override the form pattern |
navstyle |
tabs, links, disable |
Global setting | Override the navigation style |
login_redirect |
URL or same |
Global setting | Redirect after login |
register_redirect |
URL or same |
Global setting | Redirect after registration |
Examples:
<!-- Basic form -->
[cm_login_form]

<!-- Login only -->
[cm_login_form forms="login" active="login"]

<!-- Login and register with tabs -->
[cm_login_form forms="login,register" active="register" navstyle="tabs"]

<!-- Full set with custom redirects -->
[cm_login_form active="login" forms="login,register,lostpw" login_redirect="/dashboard" register_redirect="/welcome"]
Use the Shortcodes Tab to Generate One
The Shortcodes tab builds the shortcode visually so you do not have to remember the attributes.
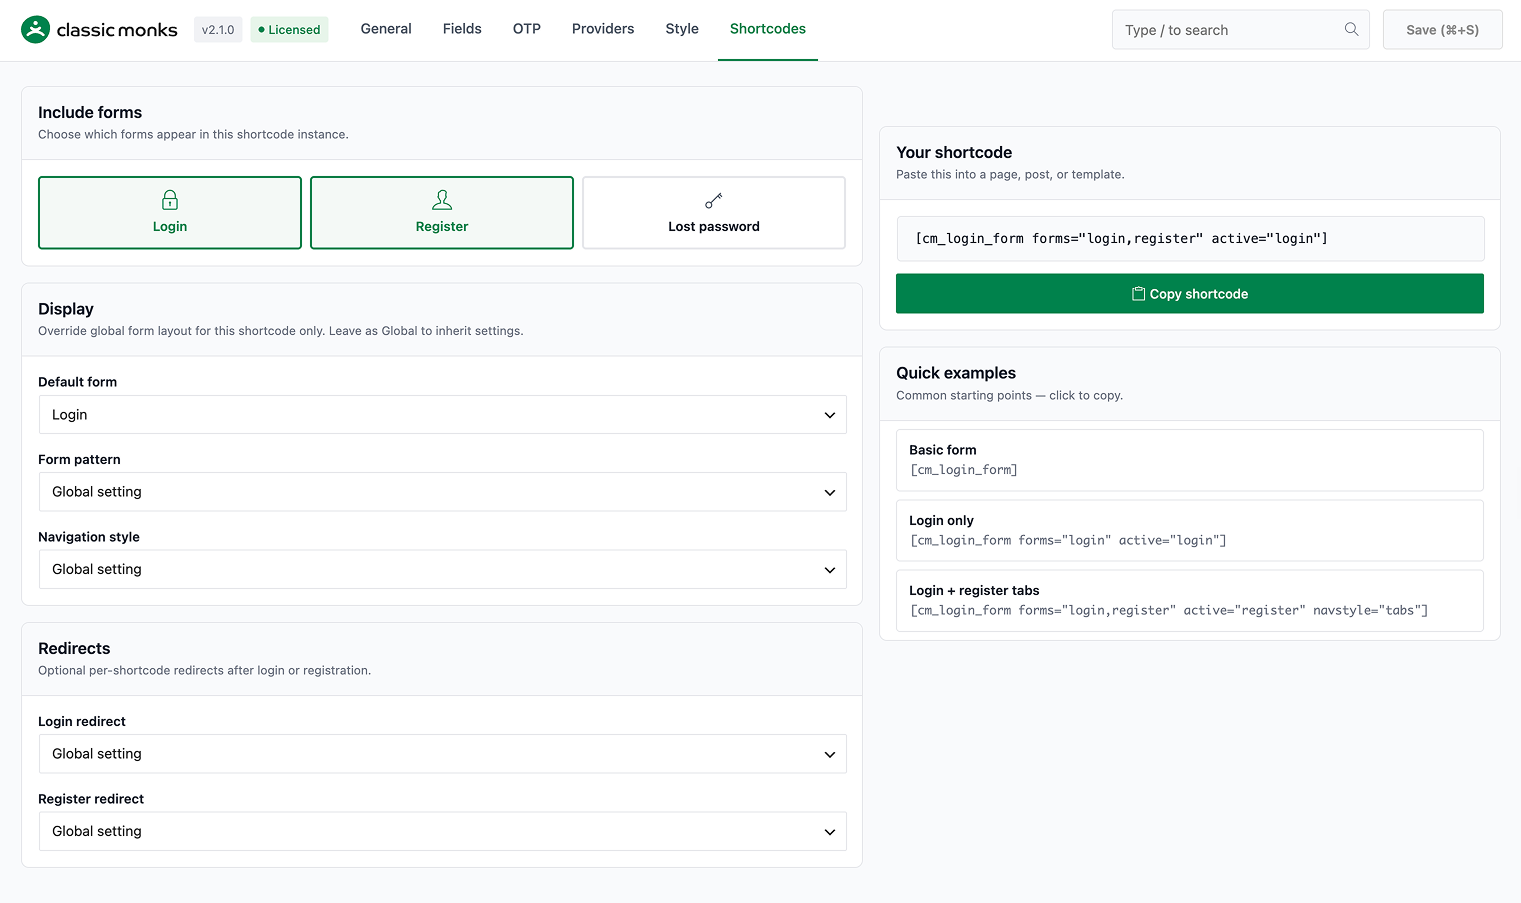
- Under Include forms, check the boxes for the forms you want in this instance: Login, Register, or Lost password.
- Under Display, set the default form, the form pattern, and the navigation style. Leave any option on Global setting to inherit from the General tab.
- Under Redirects, set optional per-shortcode login and register redirects to Same page or a Custom URL.
- Click Copy shortcode to copy the generated code, then paste it into any page, post, or widget area.
The generator also lists quick examples, such as Basic form, Login only, and Login + register tabs, that you can click to copy.
Verify It Works
- Place the shortcode. Add
[cm_login_form]to a page and confirm the login form renders. - Test phone OTP. Open the Test SMS tab under Classic Monks > Login > Providers, send a test code, and confirm it arrives.
- Test email OTP. Confirm the email OTP is delivered and not blocked or sent to spam.
- Test a full registration. Register a new user and confirm the OTP is required (if configured) and the auto-login works.
- Test checkout (if WooCommerce). Add a product, go to checkout, and verify the phone OTP step before the order completes.
WooCommerce Integration
When WooCommerce is active, the feature integrates with:
- My Account Page: replaces the default WooCommerce login form with the OTP form. Configure the shortcode under General > Integrations.
- Checkout: adds a guest login form and optional phone OTP verification. A verified phone is saved to the order’s billing info.
- Registration Default Role: automatically switches to the
customerrole instead ofsubscriberwhen WooCommerce is detected.
Configure these under General > Integrations and OTP > WooCommerce Checkout.
Replace the Default WordPress Login
To replace the default login screen, enable Replace wp-login.php Forms under General > Forms. When enabled:
- Visitors to
wp-login.phpsee the Classic Monks form instead of the default WordPress login - The password reset flow uses the feature’s email-based reset (link or code)
- Administrators can still reach the original login screen by appending
?action=logintowp-login.php
If you also use the Custom Login URL security feature, confirm which one owns the wp-login.php surface, because both can rewrite it.

Add your first comment to this post