




What Are Conditional Menu Items?
Conditional Menu Items is a Classic Monks feature that adds visibility rules to individual menu items in the WordPress menu editor. Once enabled, every menu item gains a “Conditions” panel where you can set rules like “show only to logged-in users”, “hide on mobile”, or “show only on the Shop page”.
The rules are evaluated on the frontend, so the navigation adapts dynamically to the visitor’s role, device, and current page.
Why You Need It
Most sites have navigation that should differ by audience:
- B2B sites: Show “Client Portal” only to logged-in users, hide it from visitors
- E-commerce: Show “My Account” only to logged-in customers, “Login” only to logged-out visitors
- Mobile vs desktop: Show “Call Us” only on mobile, “Live Chat” only on desktop
- Member sites: Show member-only pages in the nav only to members
Without Conditional Menu Items, the only options are creating multiple nav menus and switching between them (which is hard to maintain) or using CSS to hide items (which is fragile and does not help with accessibility or SEO).
How to Use Conditional Menu Items in WordPress
Step 1: Navigate to Settings
Click into the Classic Monks plugin settings in your WordPress dashboard.
Step 2: Go to the Content Subtab
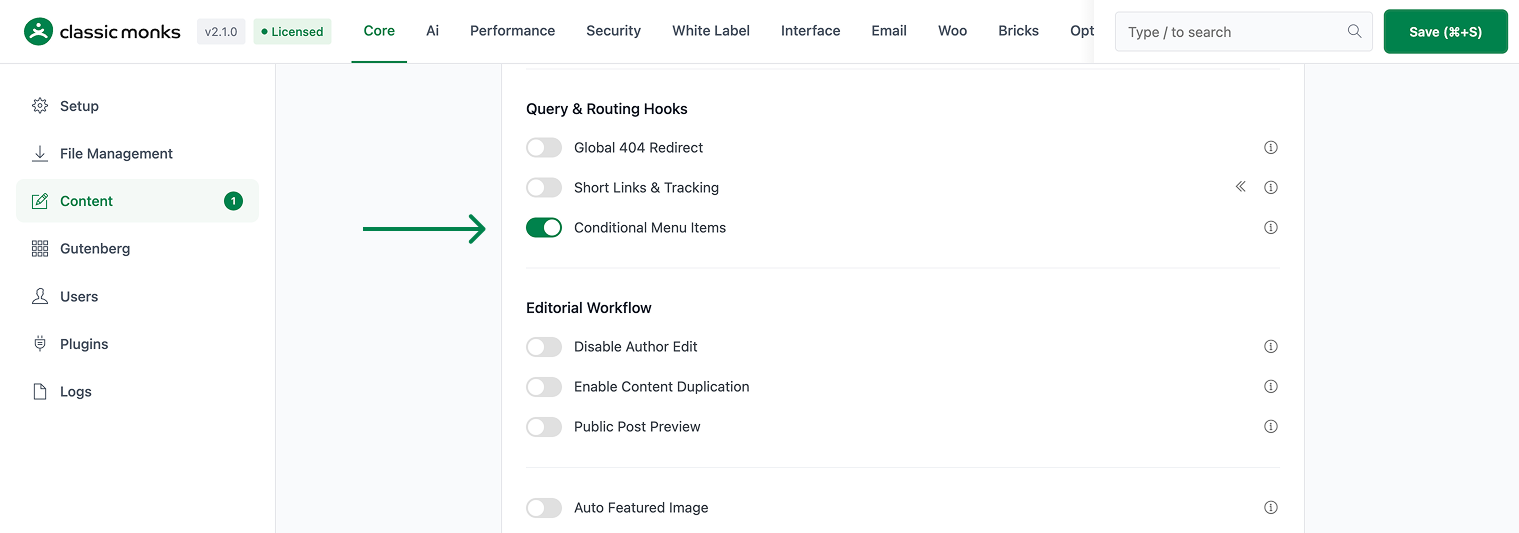
Click on the Core menu, then click the Content subtab.
Step 3: Enable Conditional Menu Items
In the Query & Routing Hooks category, toggle on Conditional Menu Items. The toggle is labeled “Control visibility of menu items based on user roles, device type, page context, and more with advanced AND/OR logic.”
Step 4: Save Changes
Click Save Changes.
Step 5: Open the WordPress Menu Editor
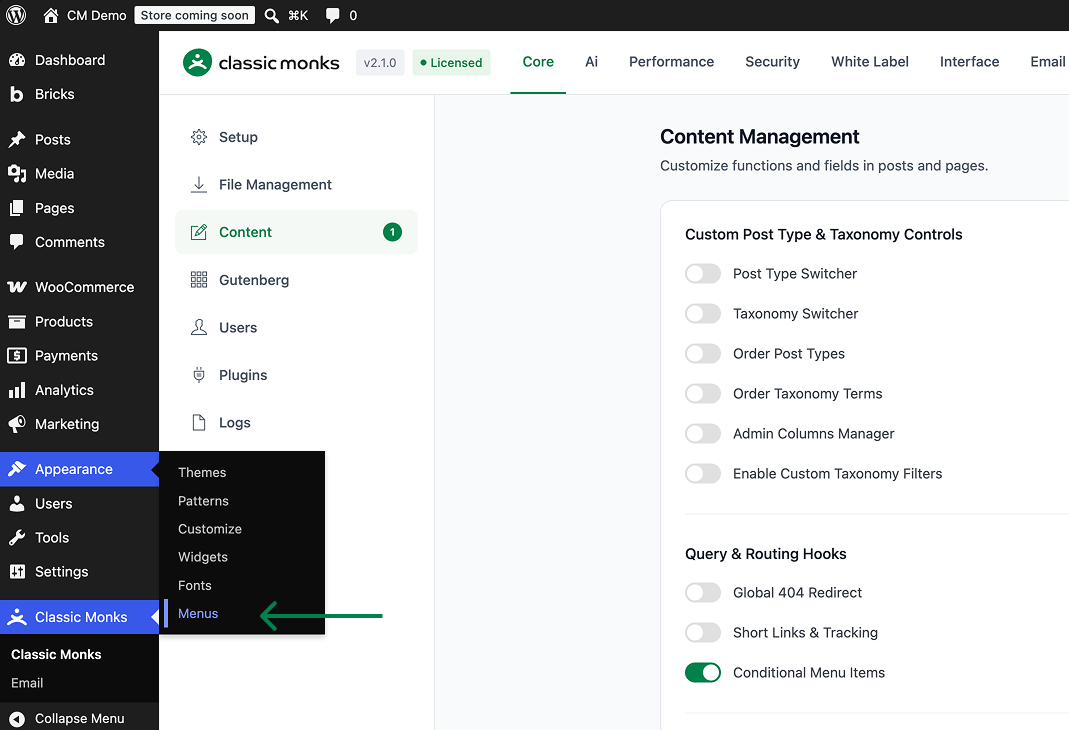
Go to Appearance > Menus in the WordPress admin. Select the menu you want to add conditions to, or create a new one.
Step 6: Add a Menu Item
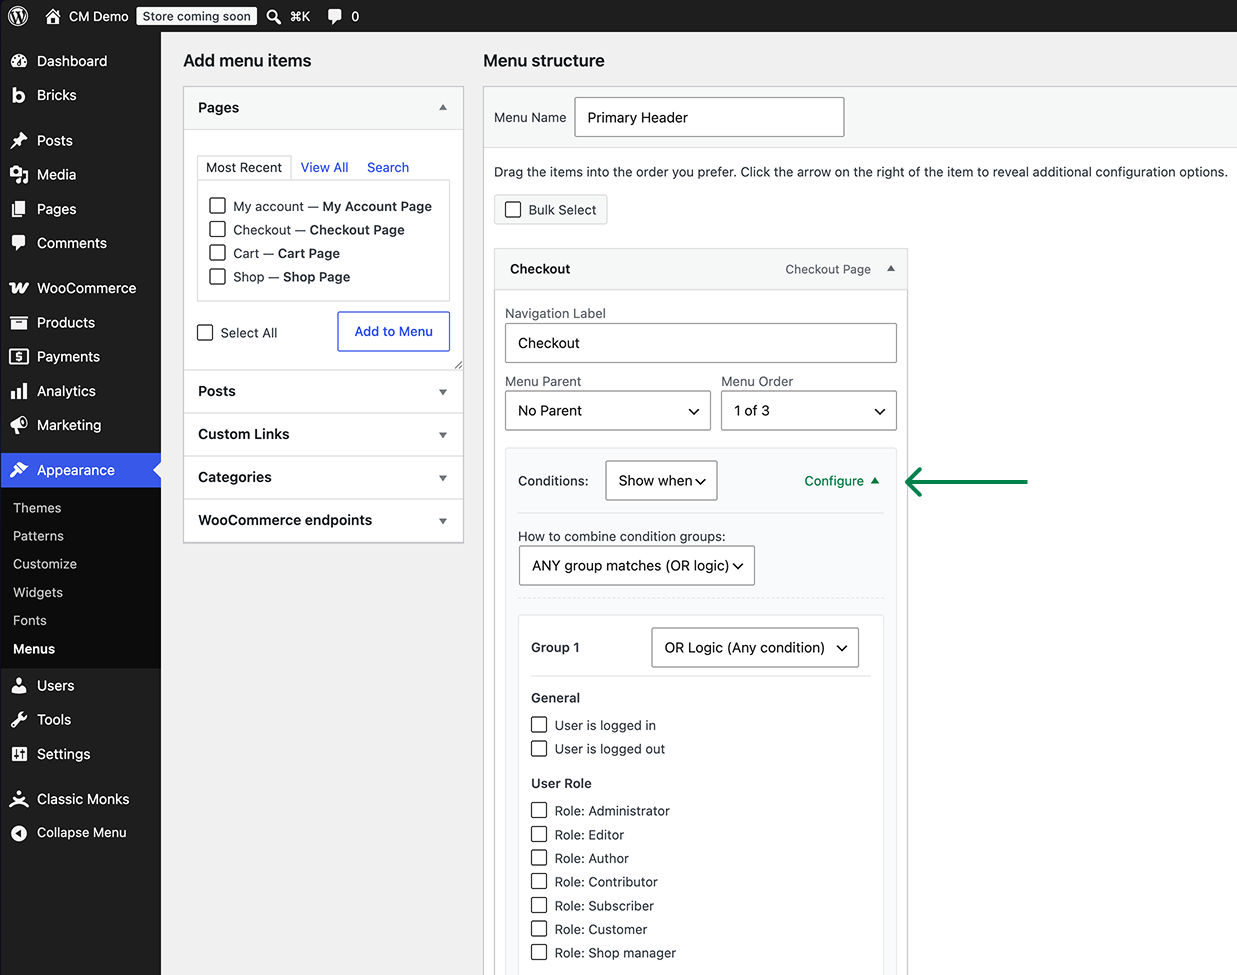
Add any menu item (page, post, custom link, category). The standard WordPress menu item panel appears with a new Conditions section.
Step 7: Choose Show or Hide
In the Conditions section, use the Show when / Hide when select to set the base behavior. Show when displays the item when the conditions match; Hide when hides it when the conditions match.
Step 8: Choose How Groups Combine
Use the ANY group matches (OR logic) or ALL groups match (AND logic) select to decide how condition groups combine.
Step 9: Add Conditions
Under each condition group, tick the checkboxes for the conditions you want. Conditions are grouped by category (general, user role, device, page type, and more). Each group can use its own OR or AND logic.
Step 10: Add More Groups (Optional)
Click Add condition group to create additional groups. Each group can hold a different set of conditions.
Step 11: Save the Menu
Click Save Menu. The conditions are now active.
Available Condition Types
Conditions are grouped into categories in the menu editor. The categories and their conditions are:
General
| Condition | Description |
|---|---|
| User is logged in | Show when the visitor is authenticated |
| User is logged out | Show when the visitor is anonymous |
User Role
| Condition | Description |
|---|---|
| Role: Administrator | Show when the visitor has the Administrator role |
| Role: Editor | Show when the visitor has the Editor role |
| Role: Author | Show when the visitor has the Author role |
| Role: Contributor | Show when the visitor has the Contributor role |
| Role: Subscriber | Show when the visitor has the Subscriber role |
A “Role: ” condition is generated for every role on the site, including custom roles.
Device
| Condition | Description |
|---|---|
| Mobile Device | Show on mobile devices (uses WordPress mobile detection) |
| Desktop | Show on desktop devices |
Page Type
| Condition | Description |
|---|---|
| Front Page | Show on the site front page |
| Blog Page | Show on the blog posts index |
| Single Post | Show on single post pages |
| Any Page | Show on any singular page |
| Archive Page | Show on archive pages |
| Search Results | Show on search results pages |
| 404 Error Page | Show on the 404 page |
Custom Post Types
A “Single ” and ” Archive” condition is generated for every public custom post type. For example, a Portfolio post type adds “Single Portfolio” and “Portfolio Archive”.
Taxonomies
A ” Archive” condition is generated for every public taxonomy. For example, a Category taxonomy adds “Category Archive”, and a Tag taxonomy adds “Tag Archive”.
WooCommerce (when WooCommerce is active)
| Condition | Description |
|---|---|
| Shop Page | Show on the WooCommerce shop page |
| Product Page | Show on a single product page |
| Product Category | Show on a product category archive |
| Product Tag | Show on a product tag archive |
| Cart Page | Show on the cart page |
| Checkout Page | Show on the checkout page |
| My Account Page | Show on the My Account page |
| Has Products in Cart | Show when the cart has at least one product |
| Cart is Empty | Show when the cart is empty |
| Customer Has Purchased | Show when the logged-in customer has placed at least one order |
Configuration Options
| Option | Description | Default |
|---|---|---|
| Conditional Menu Items | Master toggle. Adds the Conditions panel to every menu item. | Off |
Per-menu-item configuration happens in the WordPress menu editor, not in the Classic Monks settings.
Advanced Options (Developers)
Conditions are registered on the init hook and filtered on the frontend through wp_get_nav_menu_items. The following filter is available to register custom condition types:
// Add a custom condition type
add_filter( 'cm_conditional_menu_conditions', function( $conditions ) {
    $conditions['user_has_subscription'] = array(
        'name'      => 'User has active subscription',
        'callback'  => function() {
            $user = wp_get_current_user();
            return (bool) get_user_meta( $user->ID, '_active_subscription', true );
        },
    );
    return $conditions;
} );initcallsregister_conditions()(registers all built-in condition types and fires thecm_conditional_menu_conditionsfilter)wp_get_nav_menu_itemscallsfilter_menu_items()(applies the conditions to each menu item on the frontend)wp_nav_menu_item_custom_fieldscallsrender_menu_item_options()(renders the Conditions panel in the menu editor)wp_update_nav_menu_itemcallssave_menu_item_options()(saves the condition data to post meta)
The frontend result is cached for 5 minutes per menu and arguments using the WordPress object cache, so heavy condition evaluation is not repeated on every request.
The cm_conditional_menu_conditions filter lets you register custom condition types with callbacks. Each condition is an array with a name and a callback that returns a boolean. Condition data is stored per menu item in the _cm_menu_item_condition post meta field.

Add your first comment to this post