




What Is Quick WordPress Setup?
A fresh WordPress installation arrives with default content (a Hello World post, a Sample Page, and plugins such as Akismet and Hello Dolly), a UTC timezone, a generic site identity, and no permalink structure. Setting up a new WordPress site by hand means clicking through several Settings screens, installing plugins one at a time, and creating pages manually. That routine takes 20 to 30 minutes.
Quick WordPress Setup compresses the whole job into one 2 to 3 minute wizard. You tick the boxes you want, and the wizard applies site identity, user registration, plugins and themes, homepage, permalinks, search engine visibility, cleanup, media sizes, and dashboard options in a single pass. For agencies that provision client sites, the time saved multiplies across every project.
The wizard is organized into eight configuration sections, each with its own sub-options:
- Site Identity
- Membership
- Install Plugins and Themes
- Homepage Settings
- Search Engine Visibility
- Cleanup and Optimization
- Media Settings
- Dashboard and Interface
Recommendations Before Enabling
- Run it only on a fresh WordPress install. The wizard is destructive by design. It removes default content (the Hello World post, Sample Page, and default plugins), creates new pages, and overwrites settings. Running it on an existing site will replace your current configuration.
- Remove the
DISALLOW_FILE_MODSconstant first. The wizard must write plugin and theme files. IfDISALLOW_FILE_MODSis defined in wp-config.php, the setup button is disabled with a warning notice. Remove the constant, run the wizard, then re-enable it. - Confirm file system write access. WordPress must be able to write to wp-config.php, the plugins folder, and the themes folder. Check permissions if the wizard completes but settings are not applied.
How to Set Up a New WordPress Site in Classic Monks
Step 1: Open the Classic Monks settings
Click Classic Monks in the WordPress admin sidebar.
Step 2: Go to the Core tab
Click the Core menu. The Setup subtab opens by default.
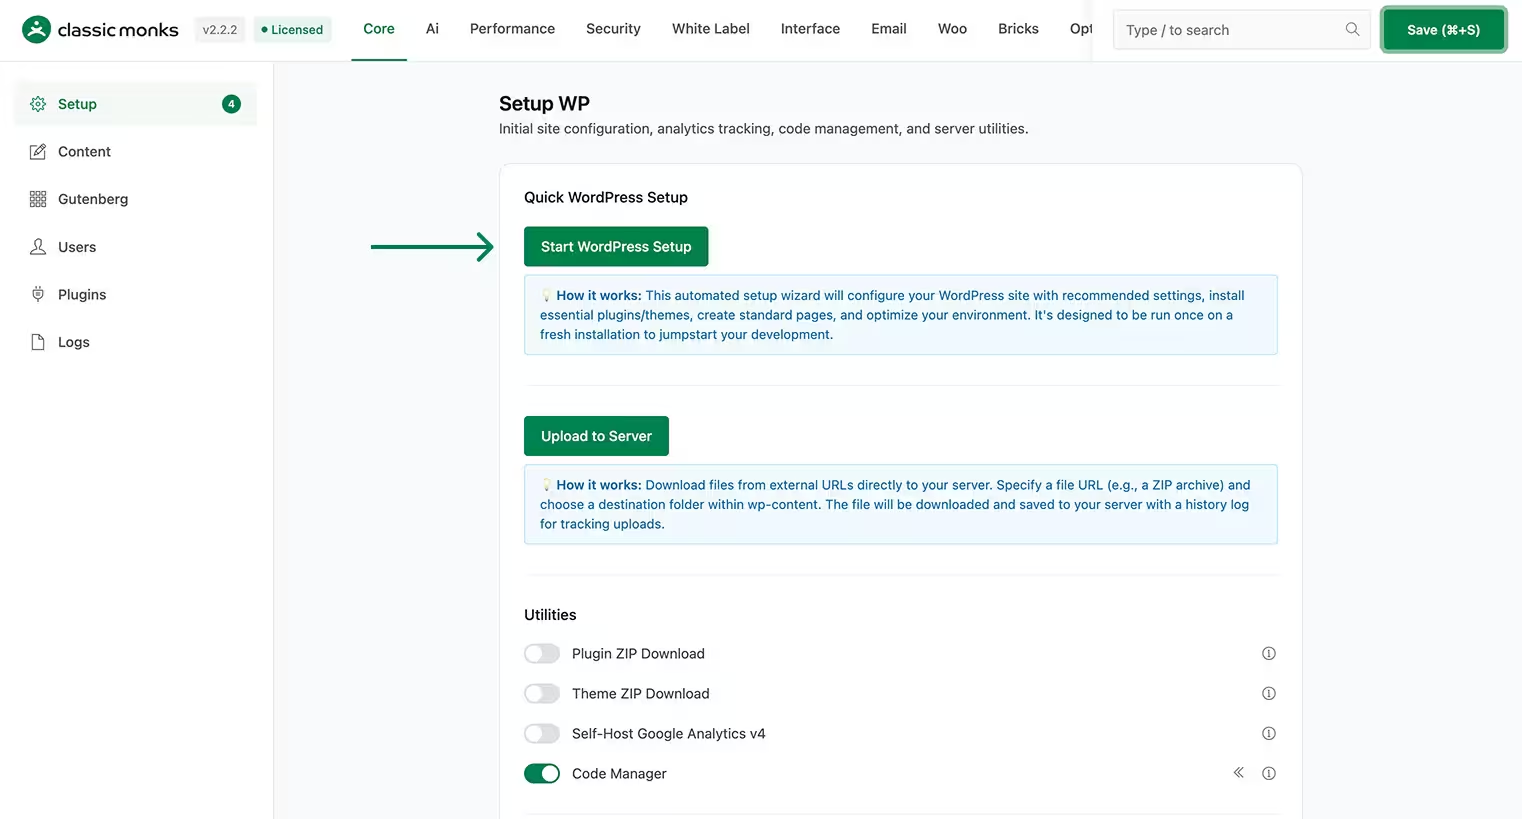
Step 3: Start WordPress Setup
The Setup subtab shows a Start WordPress Setup button. Click it to open the setup modal.
Step 4: Configure each section
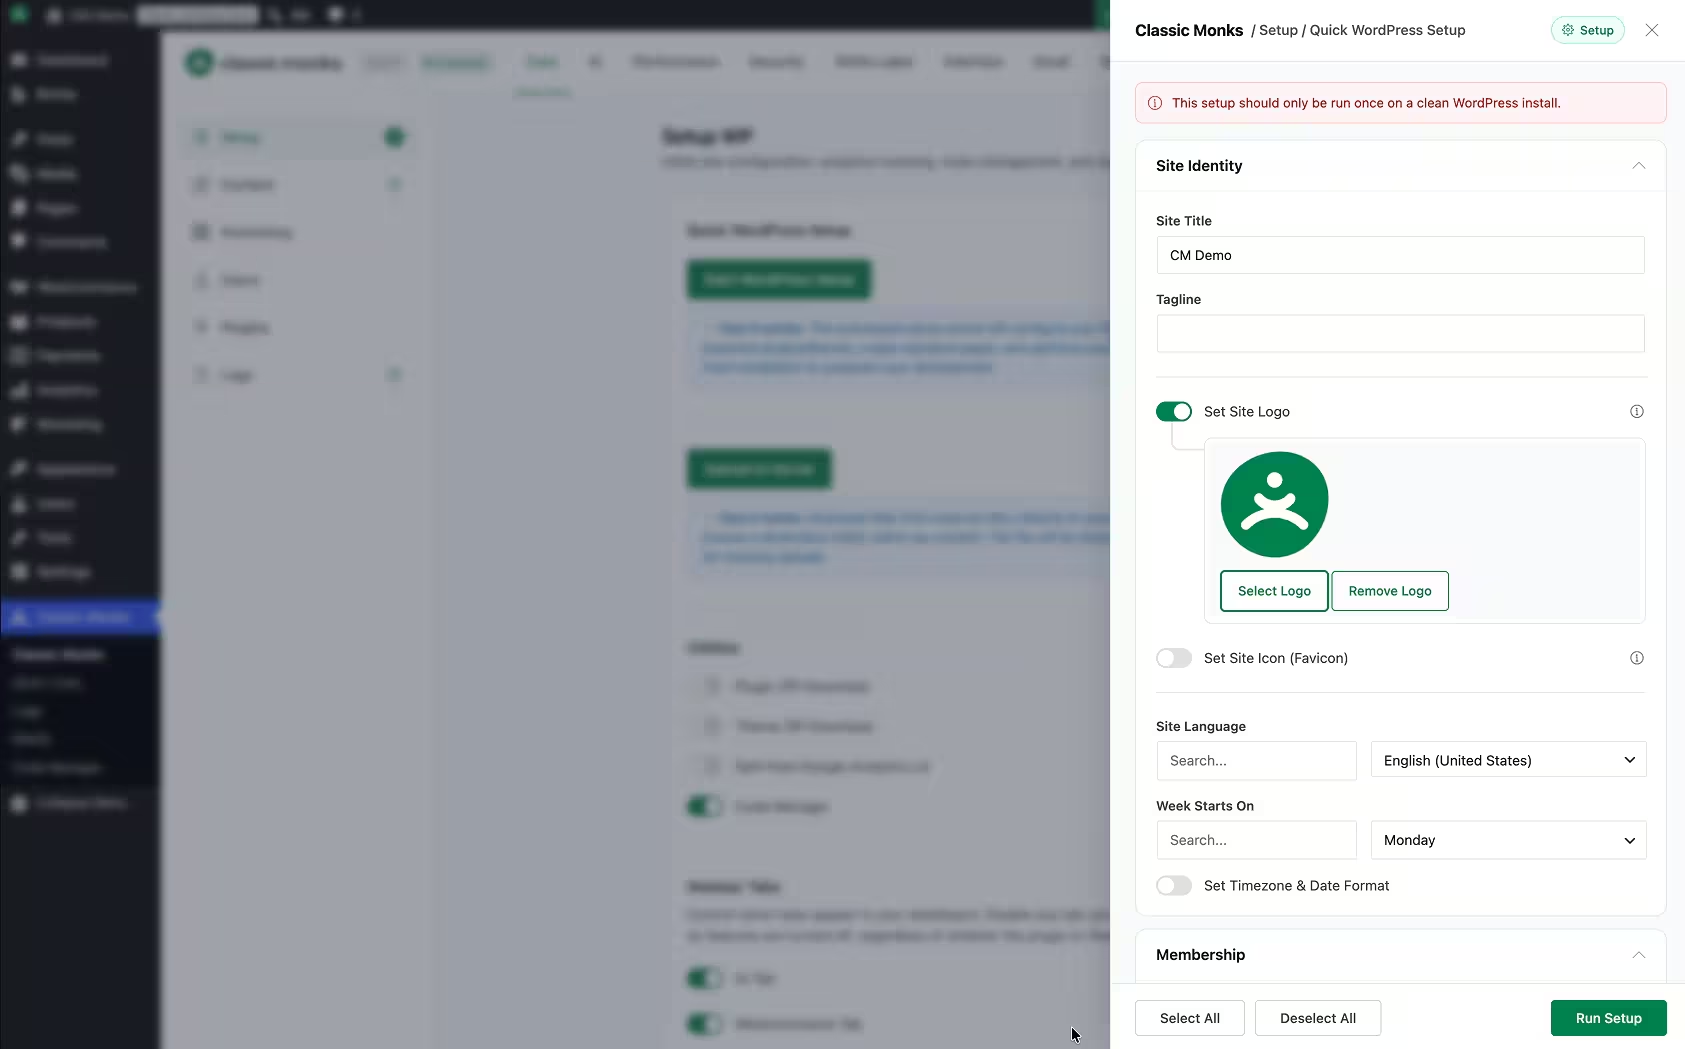
Walk through the eight configuration sections. Use Select All or Deselect All in the modal footer to toggle everything at once, or tick individual boxes and fill in the fields you want.
Step 5: Run Setup
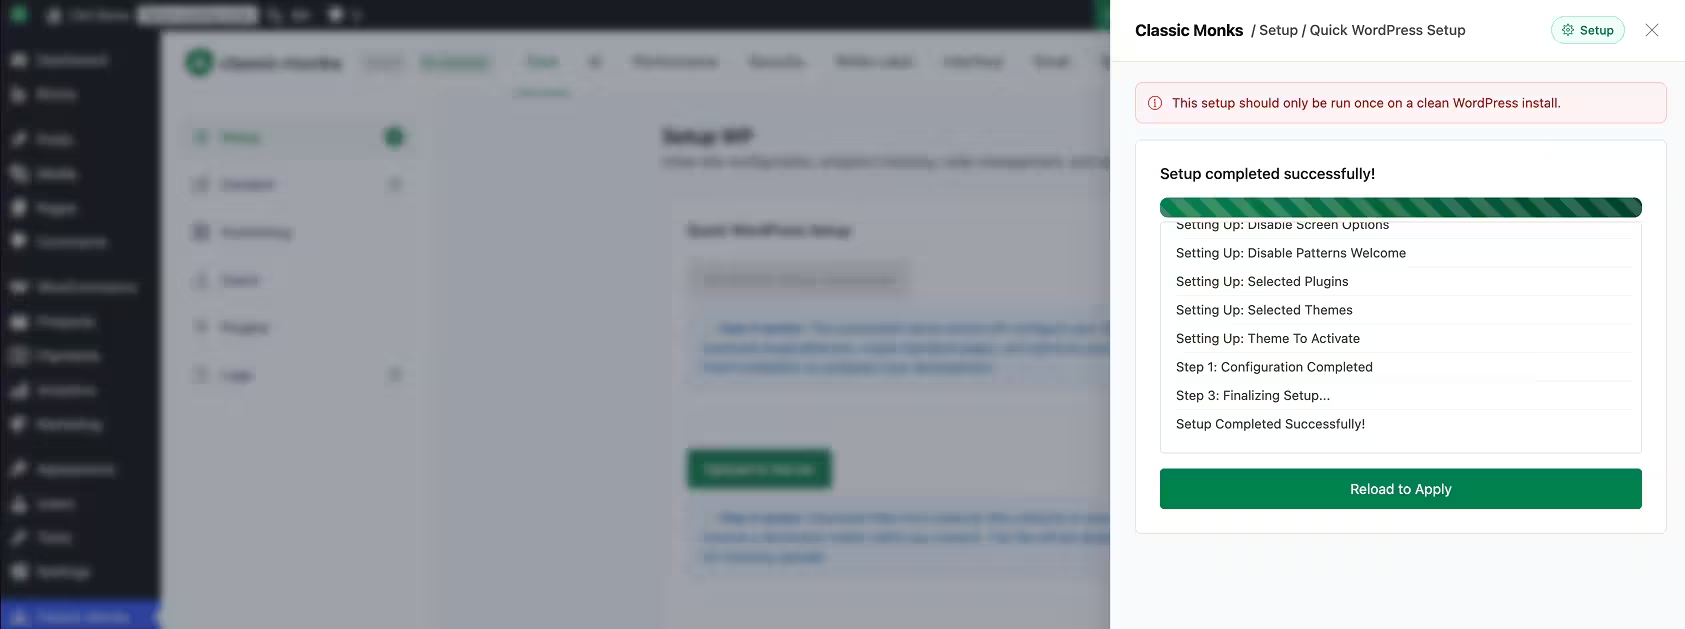
Click Run Setup in the modal footer. The wizard shows real-time progress with a progress bar and a log. The whole run takes 2 to 3 minutes.
Step 6: Reload and verify
When setup finishes, reload the WordPress admin. Your configured settings are now active. The Setup subtab changes to show a Re-run WordPress Setup button so you can run the wizard again with different options.
Configure the Setup Options
Each section controls a specific part of your new site. The defaults are safe starting points; change only what your project needs.
Site Identity
The Site Identity section sets your site’s name, regional settings, and brand assets.
| Option | Type | Description | Default |
|---|---|---|---|
| Site Title | Text input | The name of your site. Appears in the browser tab, search results, and theme header. | Current site title |
| Tagline | Text input | A short description of your site. Appears below the site title in the theme header. | Current tagline |
| Set Site Logo | Toggle | Open the WordPress Media Library and upload a logo to use as the site’s main logo. | Off |
| Set Site Icon (Favicon) | Toggle | Upload a square image (512x512px minimum) for the browser tab icon. | Off |
| Site Language | Dropdown | Choose the WordPress admin language. Lists all available translations. | English (United States) |
| Week Starts On | Dropdown | Which day the week starts on for calendars and week-based queries. | Sunday |
| Set Timezone & Date Format | Toggle | Reveals sub-options for timezone, date format, and time format. | Off |
When Set Timezone & Date Format is enabled, three extra fields appear:
| Sub-Option | Type | Description |
|---|---|---|
| Timezone | Dropdown | Grouped by continent (Africa, America, Asia, Europe, and so on). |
| Date Format | Dropdown | Five options (F j, Y; Y-m-d; m/d/Y; d/m/Y; j F Y) with a live preview. |
| Time Format | Dropdown | g:i a (lowercase AM/PM), g:i A (uppercase AM/PM), or H:i (24-hour). |
Membership
The Membership section controls whether visitors can register and what role they receive.
| Option | Type | Description | Default |
|---|---|---|---|
| Anyone Can Register | Toggle | Allow visitors to create user accounts on your website. | Off |
| New User Default Role | Dropdown | The role assigned to new registrations. Lists all registered roles including any custom ones. | Subscriber |
Why this matters: on a client site you may want registration with a custom role (a Customer role for WooCommerce, or Subscriber for a blog). The wizard sets this once so you do not have to find it in Settings > General.
Install Plugins and Themes
This section installs plugins and themes from the WordPress.org repository or from local ZIP files.
For plugins:
- Type in the search box to find plugins in the WordPress.org repository (for example Wordfence, RankMath, or WPForms).
- Click each result to add it to the install queue (shown in the Selected list).
- Or click Add Plugin(s) to upload plugin ZIP files from your computer. Multiple files can be selected and
.zipis the accepted format.
For themes:
- Search for themes or upload theme ZIP files.
- Select a theme from the Select Theme to Activate dropdown, which lists installed and queued themes.
- The selected theme activates when you run the setup.
Note: plugins are activated automatically. Themes must be explicitly selected for activation.
Homepage Settings
The Homepage Settings section decides what visitors see on the front page.
| Option | Type | Description | Default |
|---|---|---|---|
| Your latest posts | Radio | Show a blog-style feed of your latest posts on the homepage. | Selected |
| A static page | Radio | Show a specific page as the homepage. Reveals two dropdowns when selected. | Not selected |
When A static page is selected, two extra fields appear:
| Sub-Option | Type | Description |
|---|---|---|
| Homepage | Dropdown | Which page to use as the homepage. Lists all published pages. |
| Posts Page | Dropdown | Which page to use for the blog feed. Lists all published pages. |
Tip: if you create pages in the Search Engine Visibility section (Auto Create Important Pages), those pages populate the Homepage and Posts Page dropdowns. You can also use the toggles in that section to assign the created Home page as the front page and the created Blog page as the posts page.
Search Engine Visibility
The Search Engine Visibility section controls indexing, permalink structure, comments, and page creation. For a live, read-only check of how your indexing settings look, see How to Enable Search Engine Visibility Status in WordPress.
| Option | Type | Description | Default |
|---|---|---|---|
| Discourage search engines from indexing this site | Toggle | Sets blog_public to 0 and prevents Google, Bing, and other engines from indexing the site. Useful for staging or development. |
Off |
| Set Permalink Structure | Toggle | Opens a dropdown to select the permalink structure. | Off |
| Disable Comments and Pings | Toggle | Disables comments and pings on new posts. Existing comments are preserved. | Off |
| Auto Create Important Pages | Toggle | Reveals sub-options to create standard pages. | Off |
When Set Permalink Structure is enabled, you can pick a structure. Post name (/%postname%/) is recommended for most sites because it produces clean, readable URLs.
When Auto Create Important Pages is enabled, these page options appear:
| Sub-Option | Default | Description |
|---|---|---|
| Home Page | On | Creates a blank Home page. |
| About Us | On | Creates a blank About Us page. |
| Contact | On | Creates a blank Contact page. |
| Services | Off | Creates a blank Services page. |
| Blog | Off | Creates a blank Blog page. |
| Privacy Policy | On | Creates a Privacy Policy page with WordPress’s default privacy content. |
| Terms and Conditions | On | Creates a blank Terms and Conditions page. |
| FAQ | Off | Creates a blank FAQ page. |
| Set Created Home Page as Front Page | On | Assigns the new Home page as the site front page. |
| Set Created Blog Page as Posts Page | Off | Assigns the new Blog page as the posts page. |
Cleanup and Optimization
The Cleanup and Optimization section removes default WordPress content that clutters a fresh installation.
| Option | Type | Description | Default |
|---|---|---|---|
| Remove “Hello World” post | Toggle | Deletes the default Hello World blog post. | Off |
| Remove Sample Page | Toggle | Deletes the default Sample Page. | Off |
| Rename “Uncategorized” to “General” | Toggle | Renames the default Uncategorized category to General. | Off |
| Remove Default Plugins | Toggle | Deactivates and deletes default plugins (Akismet, Hello Dolly). | Off |
| Remove Unused Themes | Toggle | Removes all themes except the active one. | Off |
| Remove wp-config-sample.php & readme.html | Toggle | Deletes those two files from the site root. | Off |
Note: Remove Default Plugins deactivates and deletes Akismet and Hello Dolly. If you need Akismet, install it again after running the wizard.
Media Settings
The Media Settings section controls how WordPress handles media uploads.
| Option | Type | Description | Default |
|---|---|---|---|
| Disable Thumbnail Sizes | Toggle | Stops WordPress from generating thumbnail sizes (150×150, 300×300). Saves disk space and database entries. | Off |
| Disable Year/Month Folders for Uploads | Toggle | Saves uploads directly to /wp-content/uploads/ instead of dated folders. |
Off |
| Disable Avatars | Toggle | Turns off the Gravatar avatar system so no profile pictures load from Gravatar servers. | Off |
Dashboard and Interface
The Dashboard and Interface section cleans up the WordPress admin.
| Option | Type | Description | Default |
|---|---|---|---|
| Disable Screen Options & Widgets | Toggle | Removes the Screen Options tab and admin dashboard widgets. | Off |
| Disable Patterns & Welcome Guide | Toggle | Disables the block pattern library and the welcome guide that shows on first login. | Off |
Self-Host Google Analytics v4
The Setup subtab also includes the Self-Host Google Analytics v4 toggle, a separate but related feature. For the full walkthrough of self-hosting GA4 on any site, see How to Use Self-Hosted Google Analytics v4 in WordPress.
| Option | Type | Description | Default |
|---|---|---|---|
| Self-Host Google Analytics v4 | Toggle | Serve the GA4 tracking script from your own server instead of Google’s. | Off |
| Google Analytics Tracking ID | Text input | Your GA4 measurement ID (format G-XXXXXXXXXX). | Empty |
| Tracking Script | Dropdown | Minimal Analytics (1.4KB, recommended) for fast tracking, or Gtag.js (90KB) for full GA4 features such as events, ecommerce, and custom dimensions. | Minimal Analytics |
| Disable for logged in admins | Toggle | Skip tracking for administrators so admin activity does not skew your data. | On |
Minimal Analytics provides the core GA4 metrics without the overhead of the full Gtag.js library, making it a lean, performance-focused way to track a fresh site.
Verify It Works
- Reload the front end and confirm the homepage, pages, and URL structure match what you configured.
- Check the site title and tagline in the browser tab.
- Open Settings > Permalinks and confirm the structure applied.
- Confirm the Hello World post, Sample Page, and default plugins are gone.
- For self-hosted analytics, load the site in an incognito window and confirm the tracking script in browser dev tools.
Re-run Setup (Maintenance)
After the first run, the button reads WordPress Setup Completed and is disabled. To run the wizard again:
- Go to Options > Environment in the Classic Monks settings. See How to Use the Environment Manager in WordPress.
- Find the Quick WordPress Setup option and enable it again.
- Reload the page.
- Return to Core > Setup. The button now reads Re-run WordPress Setup.
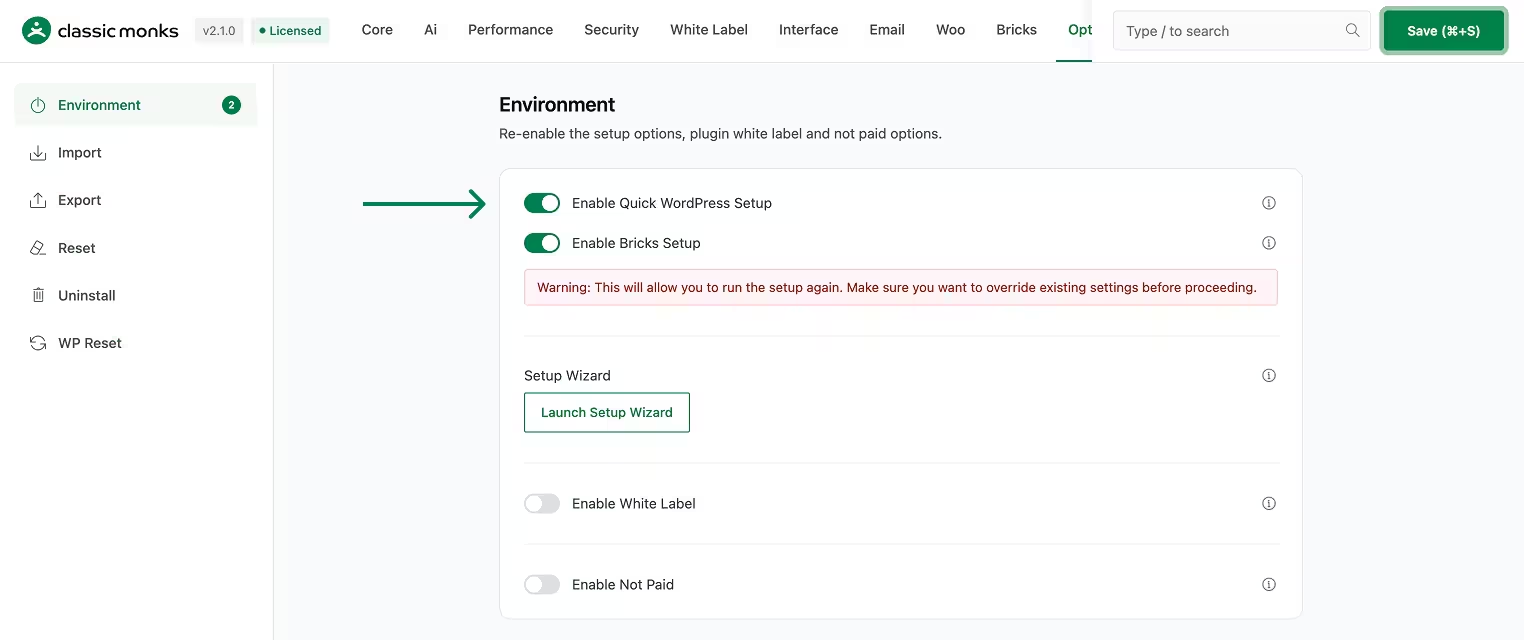
Re-running is useful when you are setting up a second site with the same configuration, recovering from a botched first run, or adopting a new standard across multiple sites.
Important: re-running applies every checked section. Deselect any sections you want to keep current first. The wizard only changes what you check.
Advanced Options (Developers)
The setup wizard runs as an AJAX-driven modal. The setup state is tracked in the wp_setup_completed option, and the wp_setup feature flag controls whether the button is available.
The wizard maps its options to Classic Monks plugin options:
| Setup Option | Plugin Options Set |
|---|---|
disable_comments |
disable_comments, modify_comment_links, remove_comments_from_admin_bar, remove_comments_menu |
disable_thumbnails |
disable_wp_responsive_images, disable_big_image_size_threshold |
disable_patterns_welcome |
deactivate_block_directory, deactivate_core_block_patterns, auto_close_welcome_guide, auto_exit_fullscreen_mode |
disable_screen_options |
remove_dashboard_widgets, remove_help_tabs |
disable_avatars |
show_avatars (set to 0) |
disable_yearmonth_folders |
disable_year_month_folders |
disable_core_sitemaps |
disable_core_sitemaps |
The wizard uses cm_update_option() to persist each setting and cm_is_feature_enabled() to check feature flags. After completion it sets wp_setup_completed to true and disables the enable_wp_setup toggle automatically.

Add your first comment to this post