




What Is the Admin Menu Manager
The Admin Menu Manager is a full visual editor for the WordPress admin sidebar menu. Instead of editing functions or a plugin file, you work directly on a list of your real menu items. You can reorder them, rename them, change their icons, add entirely new entries, and decide exactly which roles see each item.
It is one of three menu tools in the Classic Monks Interface tab, under the Menu Management subtab. The other two are the Top Toolbar Manager (for the admin bar) and Quick Post Nav (for quick navigation). The Admin Menu Manager focuses on the left sidebar menu.
Recommendations Before Enabling
- Disable conflicting sort tools. The Simple Sort Admin Menu toggle in the same subtab reorders Settings, Appearance, Tools, and Dashboard submenus alphabetically and overrides any custom order you save here. With Sort Top-Level Menus on, it also replaces the top-level order and removes custom separators and spacers. Keep only one menu reordering tool active at a time.
- Test on a staging site first. Role-based hiding blocks direct URL access, so a misconfigured rule can lock a role out of a page. Verify on a test environment before applying to production.
- You need the
manage_optionscapability. Only administrators can open the menu editor and save changes.
Enable the Admin Menu Manager
Step 1: Open the Interface Tab
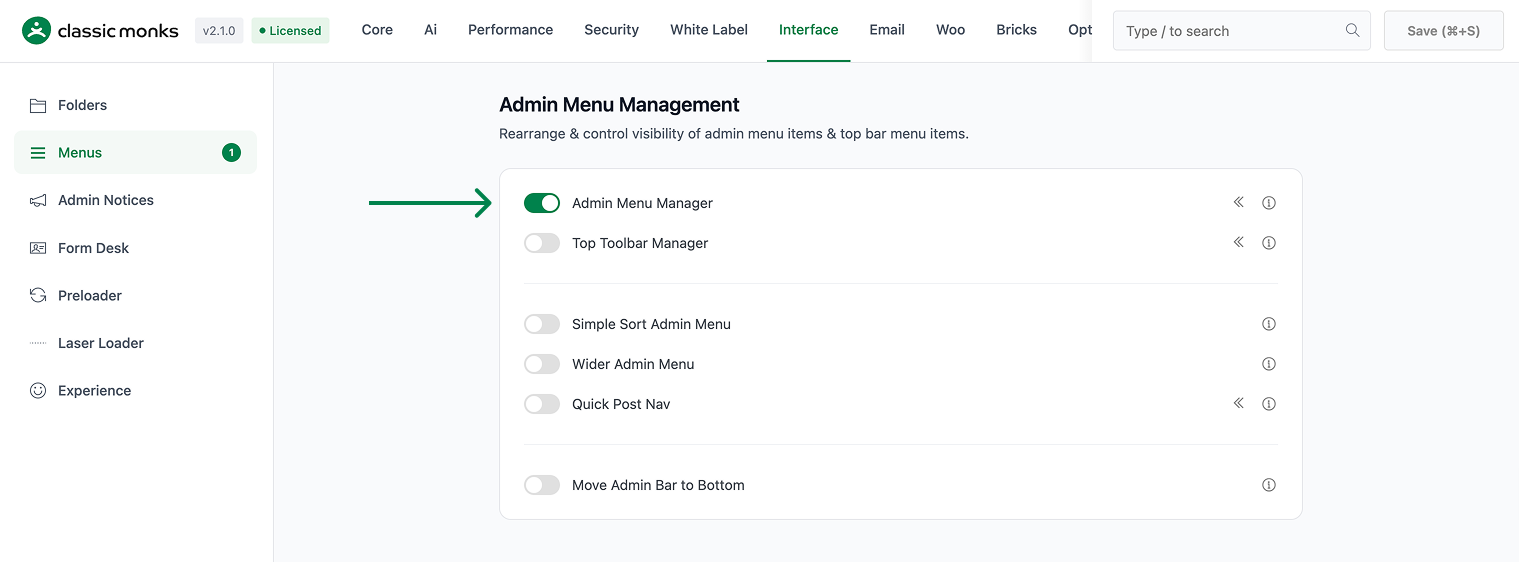
In your WordPress dashboard, go to Classic Monks and open the Interface tab, then the Menus subtab.
Step 2: Turn On Admin Menu Manager
In the Menu Management section, toggle on Admin Menu Manager.
Step 3: Save and Reload
Click Save (⌘+S). The feature adds a submenu under Classic Monks called Menu. A page reload is required before the submenu appears.
Step 4: Open the Menu Editor
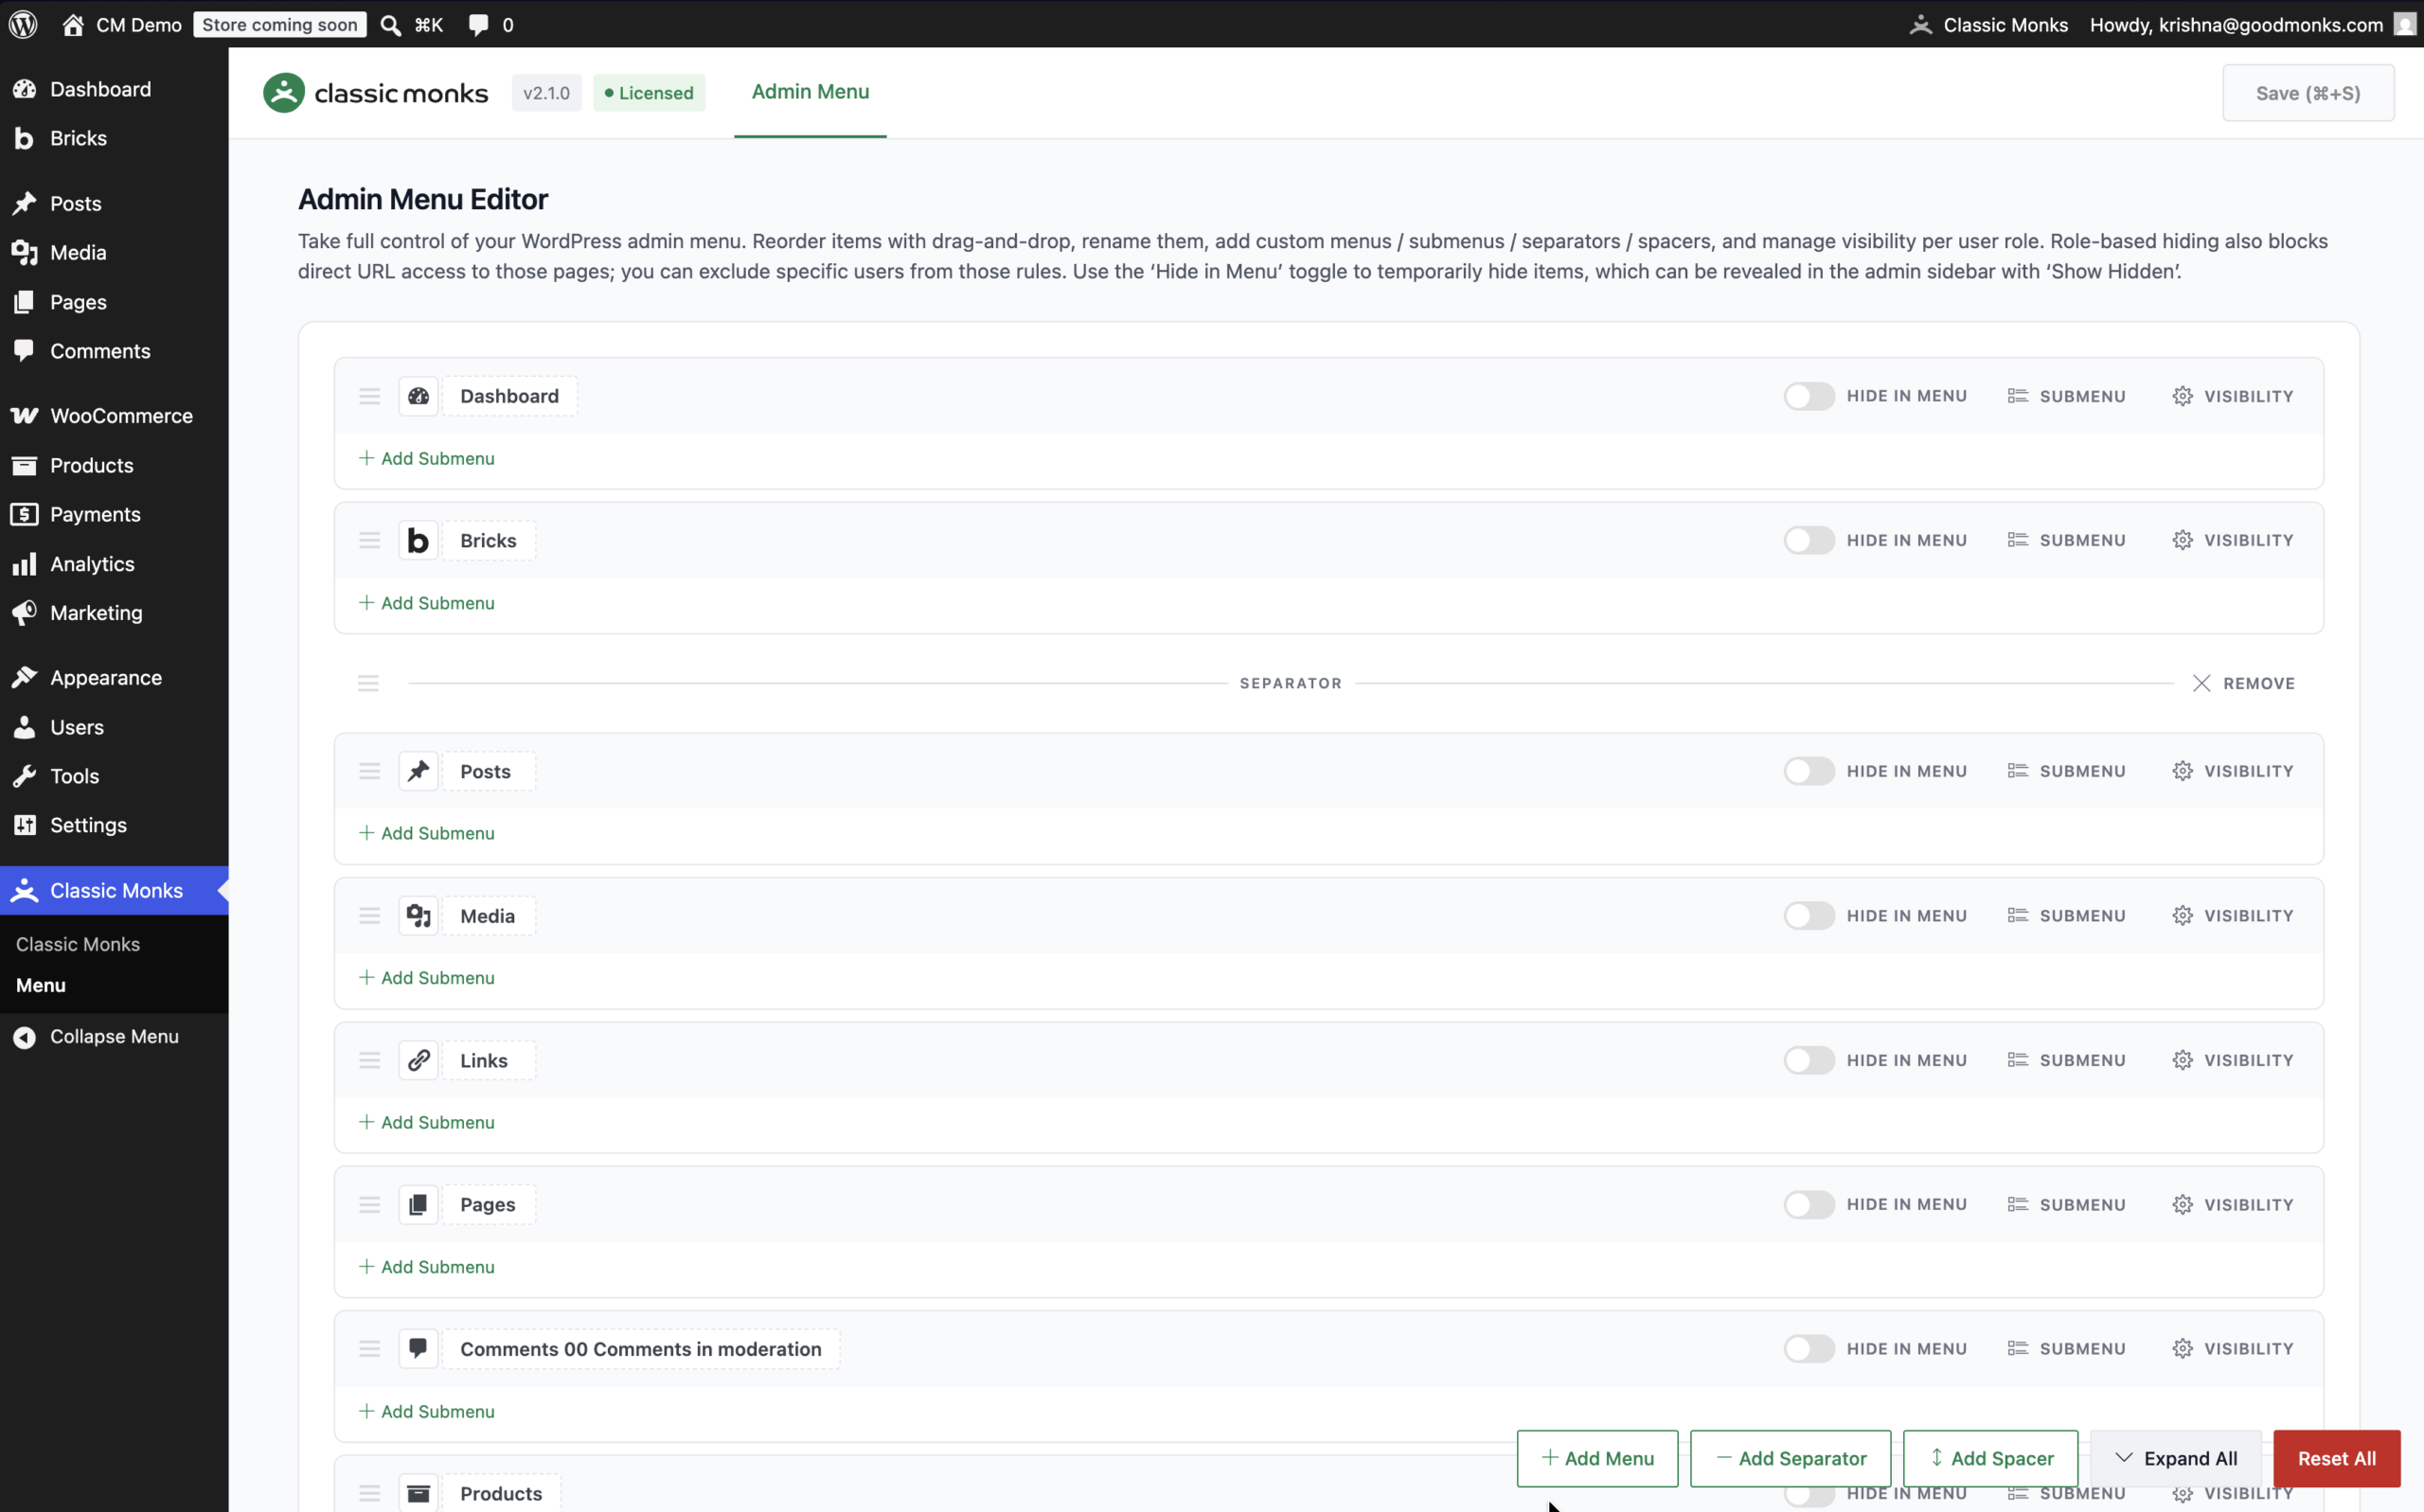
Go to Classic Monks then Menu, and open the Admin Menu tab. The heading is Admin Menu Editor.
Configure the Menu
The editor shows a list of your top-level menu items as rows. Each row has a drag handle, an editable title, a Hide in Menu toggle, a Visibility or Settings button, and an Add Submenu button. Submenus sit inside their parent and expand and collapse.
Reorder Menu Items
Drag any row by its drag handle to a new position. Top-level items move within the main list, and submenu items move within their parent. The order is saved when you click Save.
Rename Menu Items
Click any title to edit it inline. The change applies to the admin sidebar. Click elsewhere to finish editing.
Change a Menu Icon
For a top-level item, click Visibility (or Settings for a custom item) to open the options panel. In the Icon field, pick a Dashicon from the picker, or paste a dashicons-* class or an SVG data:image/svg+xml URI. Custom SVG icons are supported for top-level items.
Hide in Menu (Temporary Visibility)
Each item has a Hide in Menu toggle. Turn it on to remove the item from the sidebar. The item stays configured and is not deleted. In the live admin sidebar, a Show Hidden toggle (rendered as Show Menu / Hide Menu) appears so you can reveal hidden items temporarily. This is useful for editing a menu that has many columns or for a quick cleanup.
Manage Visibility Per Role
The Visibility button on any item opens a Hide from roles panel. Use it to control which roles see the item.
Hide from Roles
Turn on Hide from roles, then choose a scope:
- Everyone: hides the item from all users.
- Everyone except: hides the item from everyone except the roles you select. Pick the roles that still see it.
- Only these roles: hides the item only from the roles you select.
The panel lists only roles that have the capability required to open that item. For example, a page that requires edit_posts only lists roles that have that capability.
Keep Visible for Specific Users
In the same panel, use Keep visible for these users to override the role rules for specific people. Search for a user and add them. This rule overrides the role-based hiding for those users.
Direct URL Access Is Blocked
Role-based hiding is not cosmetic. When an item is hidden from a role, users of that role cannot open the page directly by URL either. They get a Sorry, you are not allowed to access this page message. This applies to top-level pages and to child pages whose parent is hidden.
Add Custom Menu Items
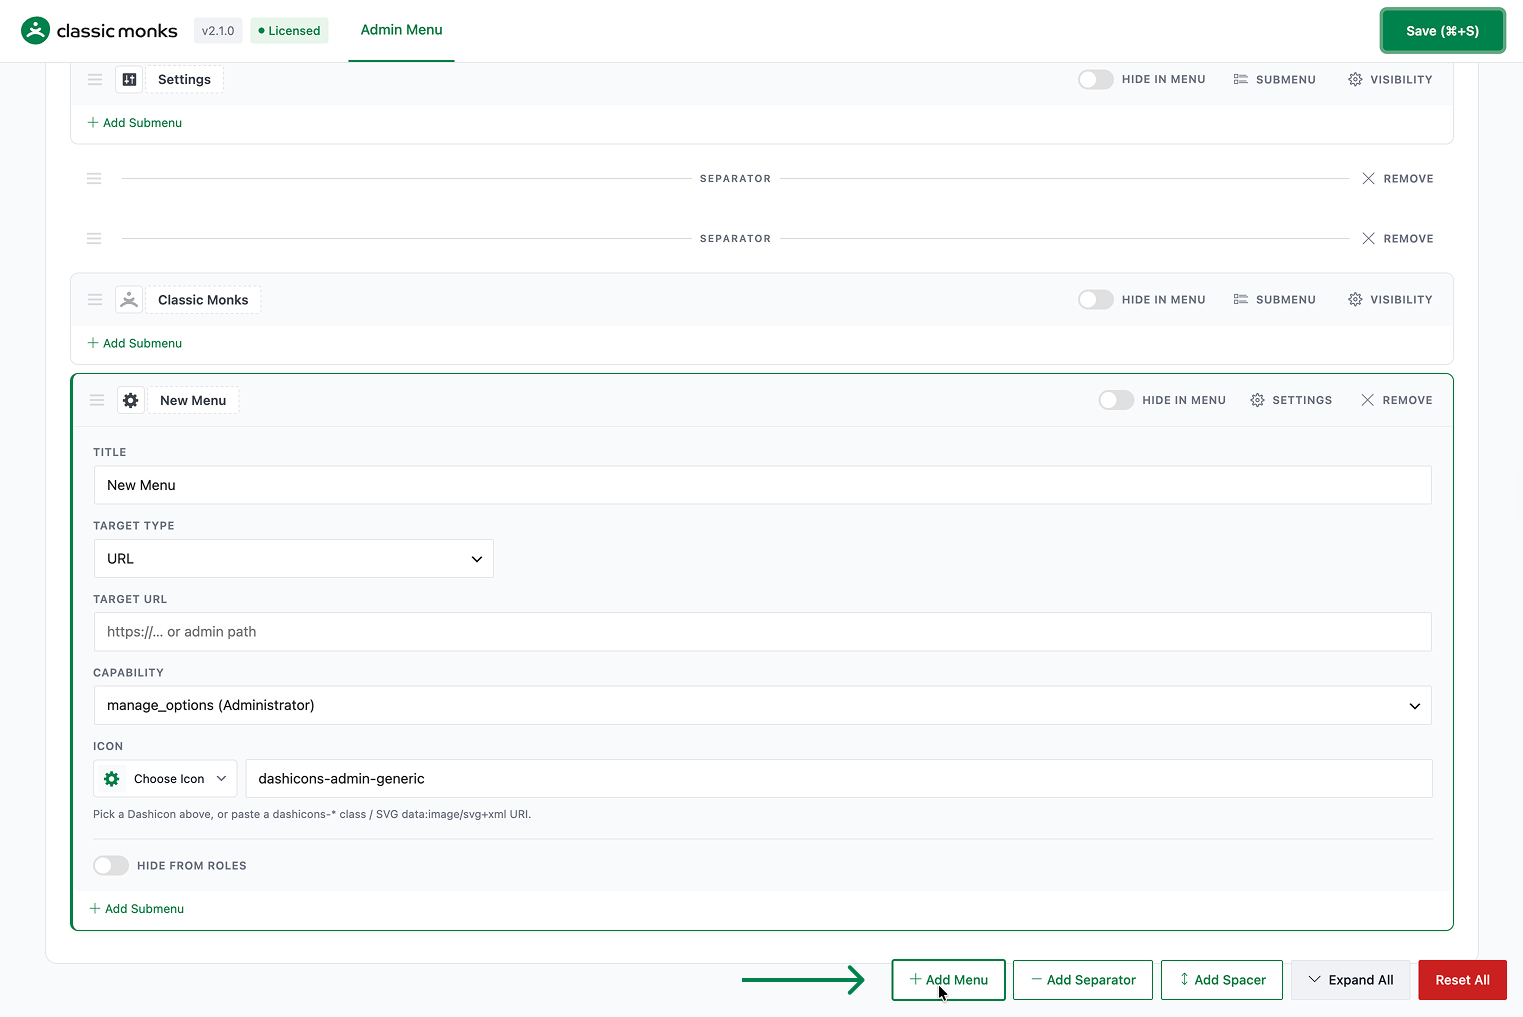
Use the action bar at the bottom of the editor to add new elements.
Add Menu
Click Add Menu to create a new top-level menu item. Configure it in the Settings panel:
- Title: the text shown in the sidebar.
- Target Type: URL links to a destination, or None (label only) creates a heading that does not navigate.
- Target URL: the destination for a URL item. Use a full URL, an admin path like
admin.php?page=..., or a site-relative path. - Capability: the required capability to see and open the item. Search from the list of available capabilities.
- Icon: a Dashicon or custom SVG for the menu item.
For a label-only item (Target Type set to None), extra styling options appear:
- Alignment: left, center, or right.
- Title Color: the text color.
- Background Color: the row background.
- Line Style: no line, underline, or sideline.
Add Submenu
Click Add Submenu inside any top-level row to add a child item. Set its Title, Target URL, and Capability. Submenus always link to a URL and do not have icons or label styling.
Add Separator
Click Add Separator to insert a divider line between menu items. Drag it to position it.
Add Spacer
Click Add Spacer to insert a blank vertical gap (no divider line) between menu items. Drag it to position it.
Remove Custom Items
Custom items, separators, and spacers have a Remove button. Click it to delete the element. Built-in WordPress items cannot be removed here; use the Hide in Menu toggle or role hiding instead.
Save, Expand, and Reset
- Save: the Save (⌘+S) button in the top corner saves all changes. The keyboard shortcut is ⌘+S on macOS and Ctrl+S on Windows.
- Expand All / Collapse All: toggles all submenu accordions open or closed.
- Reset All: restores the default WordPress menu and removes all custom order, renames, hides, custom items, separators, and spacers.
Verify It Works
After saving, open the WordPress admin sidebar and confirm:
- The reordered items appear in the order you set.
- Renamed titles and custom icons show correctly.
- Custom menus, separators, and spacers are visible in the sidebar.
- If you hid an item from a role, log in as a user of that role and confirm the item is missing and that its URL is blocked.
If a change does not appear, clear any admin or page cache, then reload.
Examples
Example 1: Group Related Items with a Separator
You want a cleaner sidebar for a client site. Add Add Separator before the Settings section and drag it into place. Rename a few verbose plugin titles to shorter ones. Save. The sidebar now reads more clearly and hides low-value plugin names.
Example 2: Create a Label-Only Section Heading
Add a custom menu item with Target Type set to None (label only) to create a section label in the sidebar, for example Internal Tools. Set its Alignment to left and choose a Title Color. Add submenus under it that link to the tools you want grouped there.
Example 3: Restrict a Menu to Editors
A client wants the Events menu hidden from subscribers. Open the Events item, turn on Hide from roles, and choose Only these roles. Select Subscriber and Customer. Save. Accounts with those roles no longer see Events or open its pages directly.

Add your first comment to this post