




What Is Classic Feedback?
Classic Feedback is a Classic Monks feature that adds a small interactive widget to the end of your post content. The widget asks the visitor a yes/no question (default: “Was this article helpful?”), tracks their response, and shows a thank-you message after they vote.
The data is stored per post, so you can see feedback totals in the post list, in Bricks Builder via dynamic data tags, and in the WordPress admin. Classic Feedback is a lightweight alternative to third-party survey tools, no external service, no JS dependencies, just a built-in yes/no widget.
Why You Need It
Post feedback is a direct signal of content quality. Comments are noisy (mostly spam, complaints, or off-topic); feedback widgets are clean (single binary signal per post). With feedback data, you can:
- Identify underperforming posts and refresh them
- Spot your best content (high yes-ratio) and promote it
- A/B test content approaches and measure which performs better
- Show feedback counts publicly (e.g., “92% of readers found this helpful”)
Classic Feedback is the simplest way to collect this data without an external survey tool.
How to Use Classic Feedback in Classic Monks
Step 1: Navigate to Settings
Click into the Classic Monks plugin settings in your WordPress dashboard.
Step 2: Go to the Content Subtab
Click on the Core menu, then click the Content subtab.
Step 3: Enable Classic Feedback
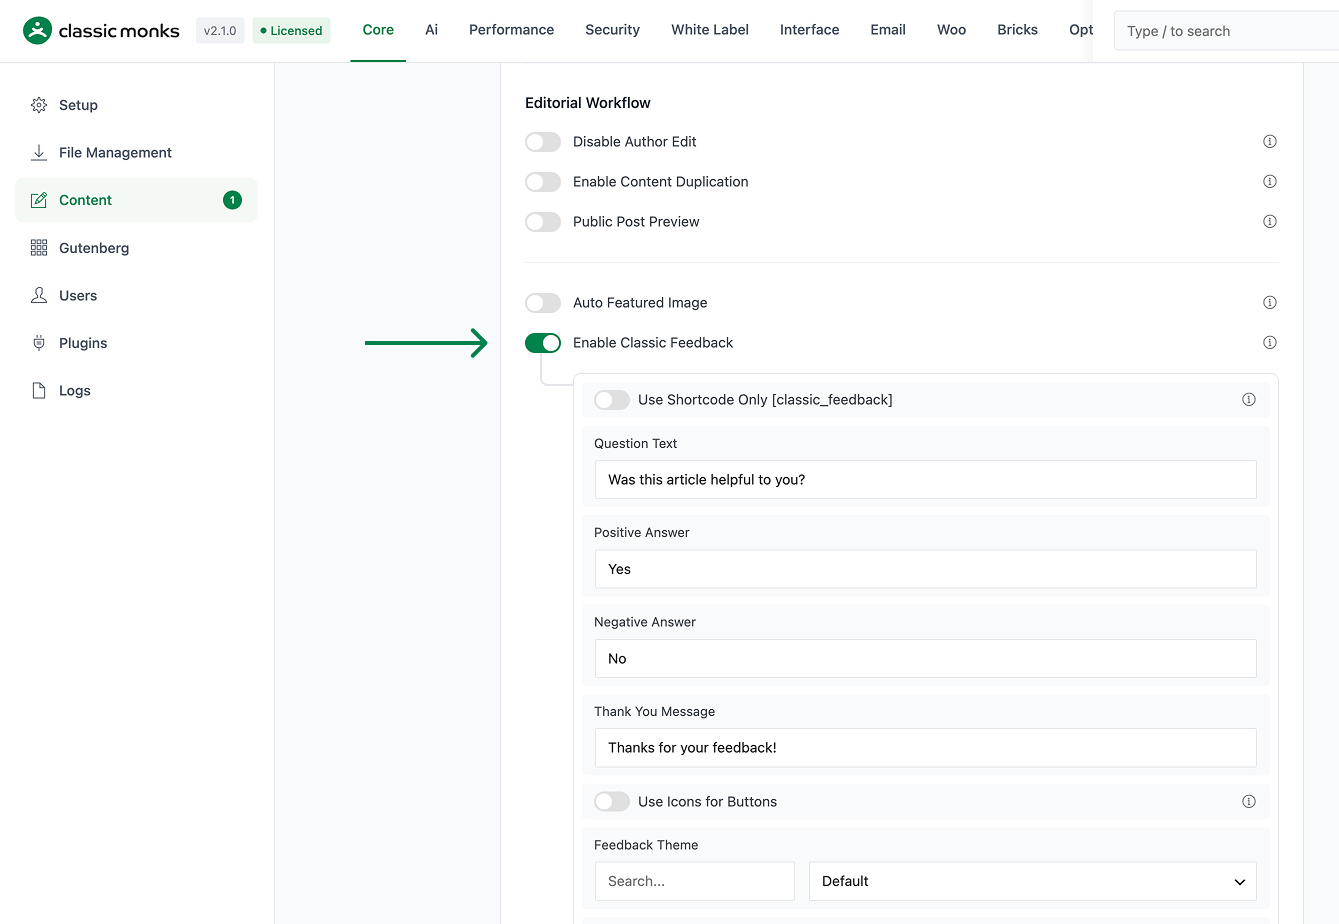
Scroll to the Editorial Workflow section and toggle on Enable Classic Feedback. Nested options expand below the toggle.
Step 4: (Optional) Use Shortcode Only
Toggle on Use Shortcode Only if you want to control feedback placement manually rather than auto-appending to post content. With shortcode-only mode, feedback appears only where you place the [classic_feedback] shortcode. The shortcode accepts attributes:
[classic_feedback use_icons="true" theme="default" position="center"]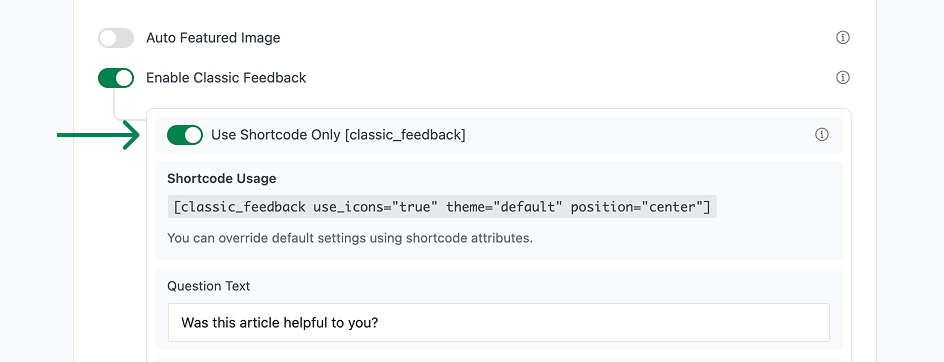
Step 5: Customize the Question Text
Enter your custom question in the Question Text field. Default: “Was this article helpful?”
Step 6: Customize the Button Labels
- Positive Answer (default: “Yes”)
- Negative Answer (default: “No”)
- Thank You Message (default: “Thanks for your feedback!”)
Step 7: Choose Icons (Optional)
Toggle on Use Icons for Buttons to display thumbs-up/thumbs-down icons next to the button labels. Pure-icon mode (no labels) is also possible if you set the labels to empty.
Step 8: Choose a Theme
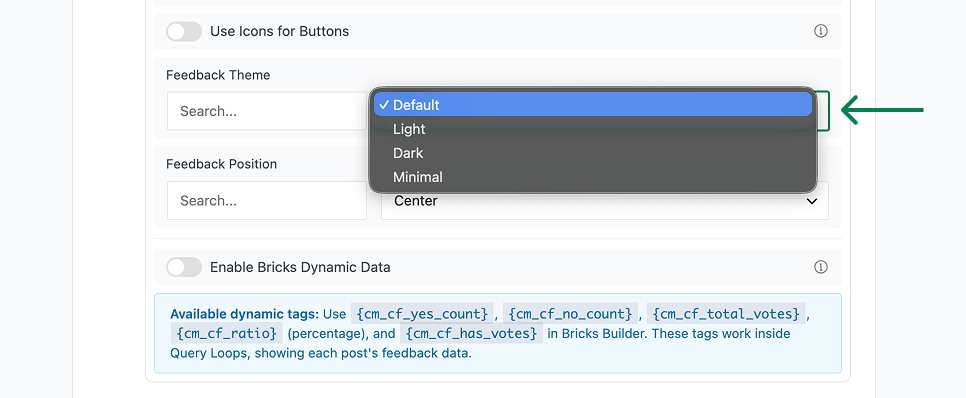
Pick from the Feedback Theme dropdown:
- Default: Light background, dark text, standard buttons
- Light: White background, subtle borders, minimal styling
- Dark: Dark background, light text, matches dark-mode sites
- Minimal: No background, just text and buttons, fits any theme
Step 9: Choose a Position
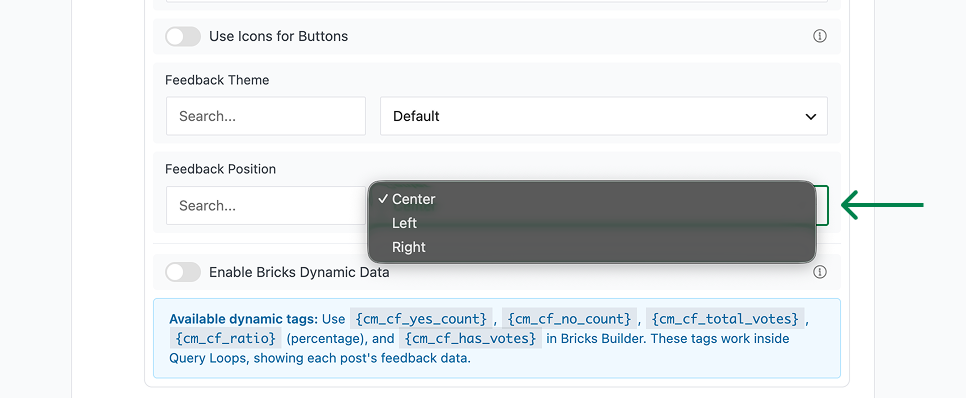
Pick from the Feedback Position dropdown:
- Center: Widget is centered in the content area
- Left: Widget aligns to the left (works in right-to-left layouts too)
- Right: Widget aligns to the right
Step 10: Choose Display Mode
Pick the Display Mode from the dropdown:
- Show only on selected: Feedback widget shows on checked post types only
- Show except on selected: Feedback widget shows on all post types except checked ones
- Show on all post types: Feedback widget shows on every public post type
Step 11: Select the Post Types
A list of every public post type appears. Check the ones you want the feedback widget to appear on. The default is post and page.
Step 12: Save Changes
Click Save Changes.
Step 13: Test on a Post
Open any post on the front-end. The feedback widget should appear at the end of the post content (or wherever you placed the shortcode). Click “Yes” or “No” to verify the vote is recorded.
Configuration Options
| Option | Description | Default |
|---|---|---|
| Enable Classic Feedback | Master toggle. | Off |
| Use Shortcode Only | Manual placement via shortcode. | Off |
| Question Text | The question displayed. | “Was this article helpful?” |
| Positive Answer | Yes button text. | “Yes” |
| Negative Answer | No button text. | “No” |
| Thank You Message | Message after voting. | “Thanks for your feedback!” |
| Use Icons for Buttons | Show thumbs-up/down icons. | On |
| Feedback Theme | Default, Light, Dark, or Minimal. | Default |
| Feedback Position | Center, Left, or Right. | Center |
| Display Mode | only-on, except-on, or all-post-types. |
only-on |
| Post Type Checkboxes | Per-post-type control. | post, page checked |
Bricks Builder Dynamic Tags
When Bricks Builder is active, Classic Feedback exposes dynamic data tags for use in Bricks templates:
{cm_cf_yes_count}: Number of yes votes for the current post{cm_cf_no_count}: Number of no votes for the current post{cm_cf_total_votes}: Total votes (yes + no){cm_cf_ratio}: Yes percentage (e.g., “87”){cm_cf_has_votes}: Boolean (1 if any votes exist, 0 otherwise)
These tags work inside Query Loops (showing per-post feedback stats in a list) and on single post pages (showing this post’s feedback stats). They are real-time: votes update the values immediately.
Example use case: Build a “Top Rated Articles” list using a Bricks Query Loop with {cm_cf_ratio} ordered by ratio, showing only posts with {cm_cf_has_votes} = 1.
Developer Notes
Classic Feedback adds a “Was this article helpful?” widget. The widget uses real WordPress options for vote tracking.
Options used:
| Option | Type | Default |
|---|---|---|
enable_classic_feedback |
Boolean | false |
Vote tracking options:
| Option | Type | Purpose |
|---|---|---|
cm_cf_has_votes |
Boolean | Whether the post has received any votes |
cm_cf_total_votes |
Integer | Total vote count |
cm_cf_yes_count |
Integer | “Yes” vote count |
cm_cf_no_count |
Integer | “No” vote count |
cm_cf_ratio |
Float | Yes/total ratio |
The feedback logic is in functions/core/content/classic-feedback.php.

Add your first comment to this post