




What Is the Top Toolbar Manager
The Top Toolbar Manager is a visual editor for the WordPress admin toolbar (also called the admin bar). It is the dark bar that appears at the top of the screen when you are logged in, on both the frontend and the admin. Instead of editing a plugin file, you work directly on a sortable list of your real toolbar items.
It is one of three menu tools in the Classic Monks Interface tab, under the Menu Management subtab. The other two are the Admin Menu Manager (for the left sidebar menu) and Quick Post Nav (for quick navigation). The Top Toolbar Manager focuses on the top bar.
Recommendations Before Enabling
- Test on a staging site first. Role-based hiding can hide a toolbar button from a role, so verify on a test environment before applying to production.
- You need the
manage_optionscapability. Only administrators can open the toolbar editor and save changes. - Items are discovered as you browse. The editor shows items captured from both the frontend and backend. If an item is missing, visit the frontend and backend of your site, then refresh the editor.
Enable the Top Toolbar Manager
Step 1: Open the Interface Tab
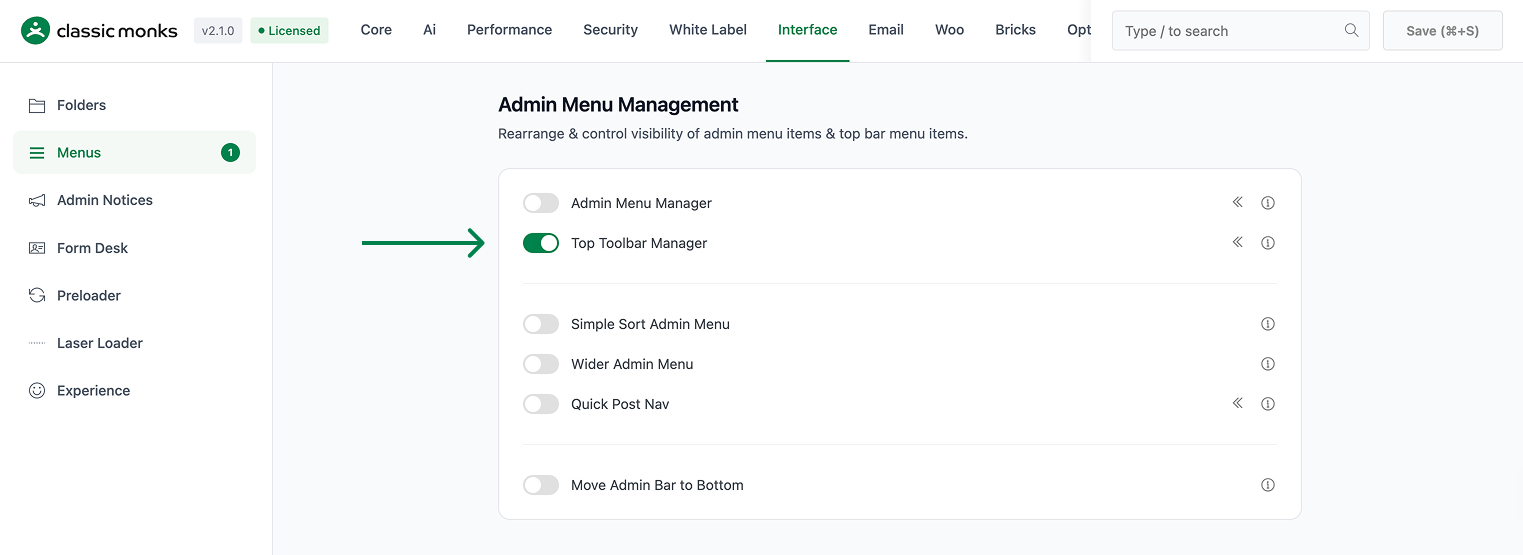
In your WordPress dashboard, go to Classic Monks and open the Interface tab, then the Menus subtab.
Step 2: Turn On Top Toolbar Manager
In the Menu Management section, toggle on Top Toolbar Manager.
Step 3: Save and Reload
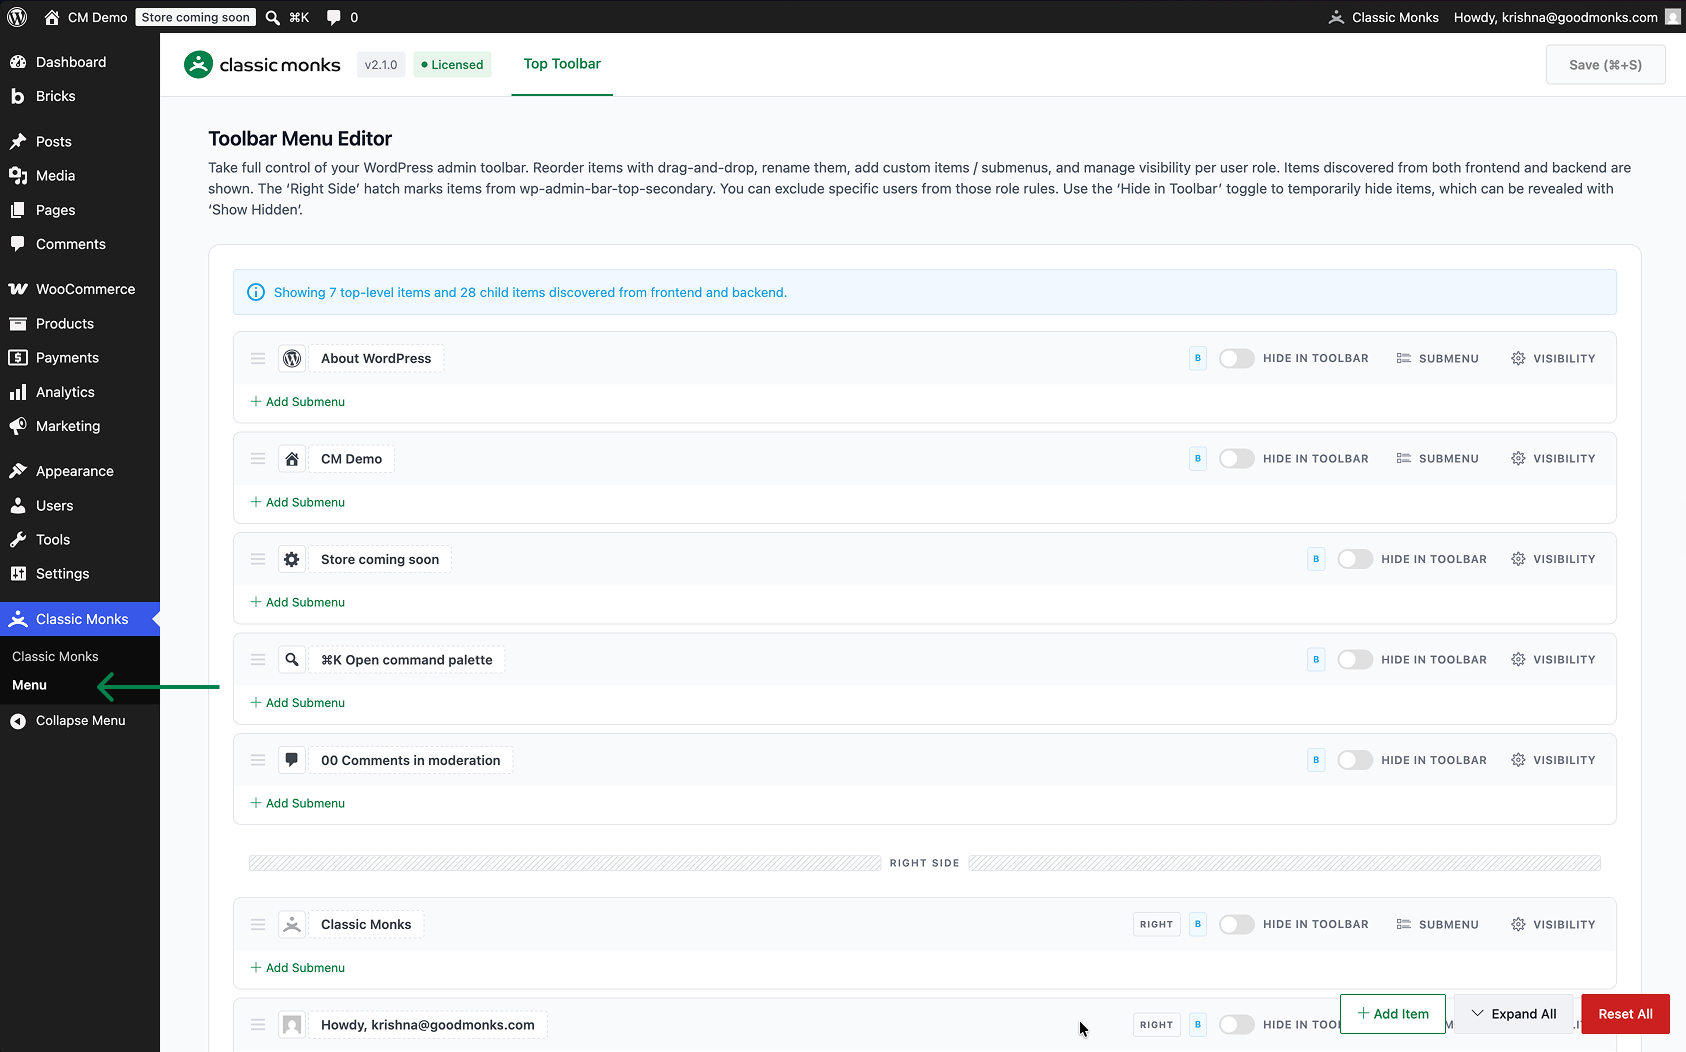
Click Save (⌘+S). The feature adds a submenu under Classic Monks called Menu. A page reload is required before the submenu appears.
Step 4: Open the Toolbar Editor
Go to Classic Monks then Menu, and open the Top Toolbar tab. The heading is Toolbar Menu Editor.
Configure the Toolbar
The editor shows a list of your toolbar items as rows. Each row has a drag handle, an editable title, a Hide in Toolbar toggle, a Visibility or Settings button, and an Add Submenu button. Submenus sit inside their parent and expand and collapse.
A context notice at the top tells you how many top-level and child items were discovered, for example Showing 18 top-level items and 54 child items discovered from frontend and backend.
Reorder Toolbar Items
Drag any row by its drag handle to a new position. Top-level items move within the main list, and submenu items move within their parent. The order is saved when you click Save.
Rename Toolbar Items
Click any title to edit it inline. The change applies to the toolbar. The existing icon is preserved when you rename an item.
Change a Toolbar Icon
For a top-level item, click Visibility (or Settings for a custom item) to open the options panel. In the Icon field, pick a Dashicon from the picker, or paste a dashicons-* class or an SVG data:image/svg+xml URI.
Move Items Between Left and Right Sides
The toolbar has a Right Side section marker in the editor. Items below this marker appear on the right side of the toolbar (WordPress wp-admin-bar-top-secondary), and items above it appear on the left. Drag an item across the marker to move it between the two sides. Items on the right side show a Right badge.
Hide in Toolbar (Temporary Visibility)
Each item has a Hide in Toolbar toggle. Turn it on to remove the item from the toolbar. The item stays configured and is not deleted. In the live toolbar, a Show/Hide Hidden Items toggle (an eye icon) appears so you can reveal hidden items temporarily.
Manage Visibility Per Role
The Visibility button on any item opens a Hide from roles panel. Use it to control which roles see the item.
Hide from Roles
Turn on Hide from roles, then choose a scope:
- Everyone: hides the item from all users.
- Everyone except: hides the item from everyone except the roles you select. Pick the roles that still see it.
- Only these roles: hides the item only from the roles you select.
Unlike the admin menu, the toolbar panel lists all roles because toolbar items are visible to any logged-in user by default.
Keep Visible for Specific Users
In the same panel, use Keep visible for these users to override the role rules for specific people. Search for a user and add them. This rule overrides the role-based hiding for those users.
Add Custom Toolbar Items
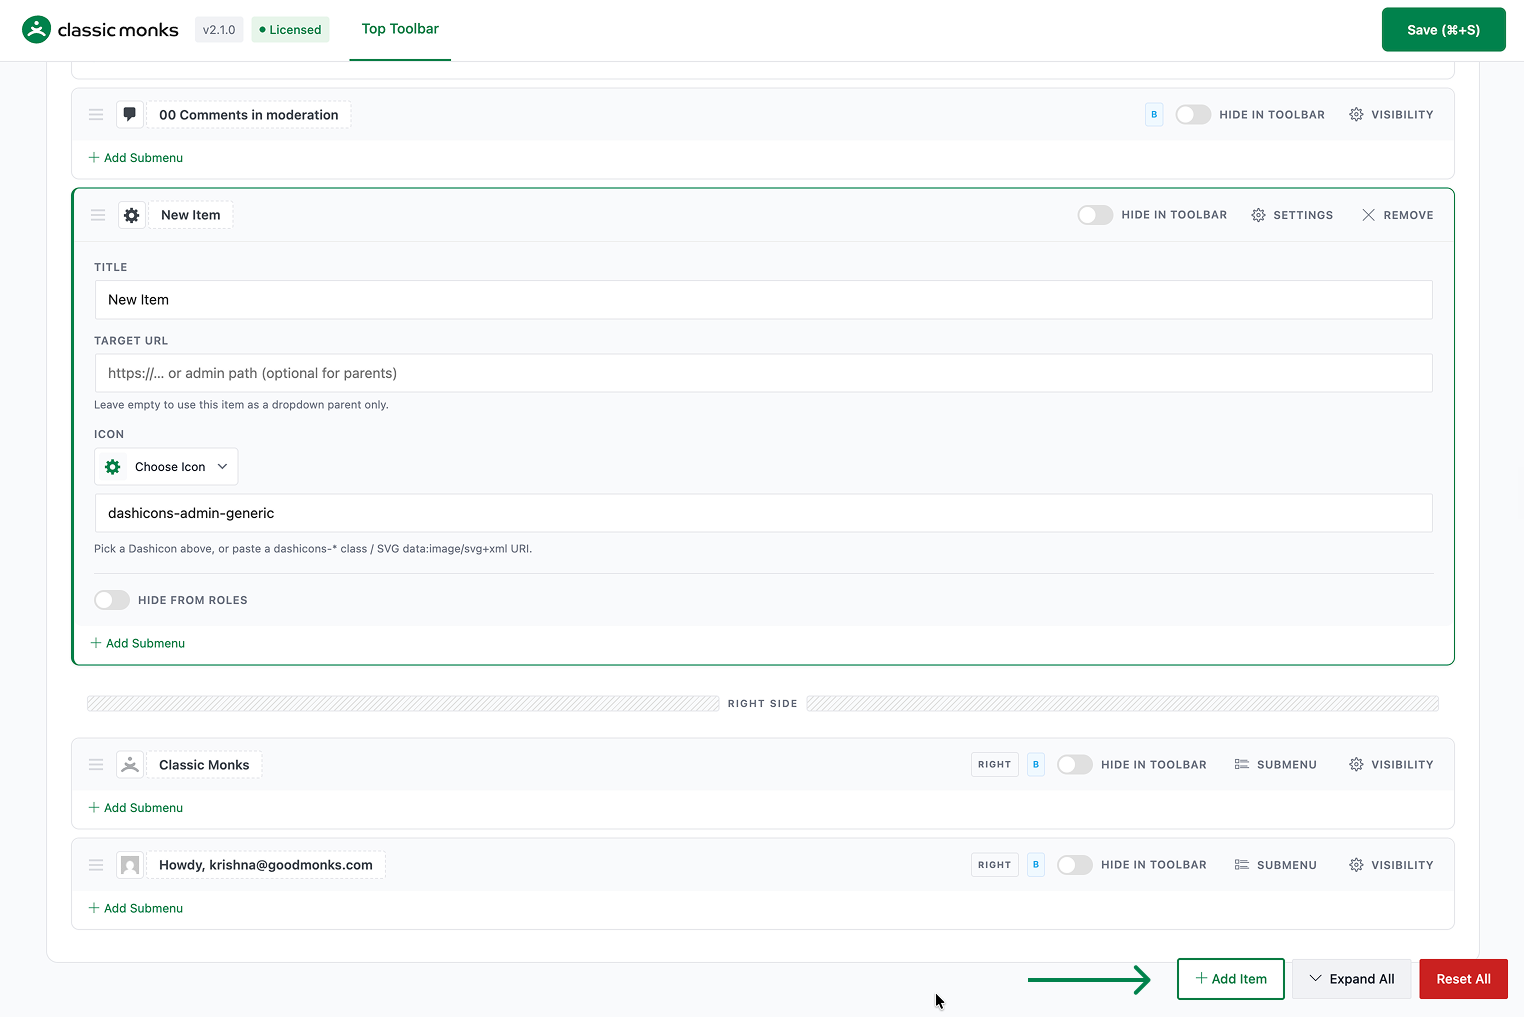
Use the action bar at the bottom of the editor to add new elements.
Add Item
Click Add Item to create a new top-level toolbar item. Configure it in the Settings panel:
- Title: the text shown in the toolbar.
- Target URL: the destination. Use a full URL, an admin path like
admin.php?page=..., or a site-relative path. Leave it empty to use the item as a dropdown parent only. - Icon: a Dashicon or custom SVG for the item.
Add Submenu
Click Add Submenu inside any toolbar item to add a child item. Set its Title and Target URL. Child items do not have icons.
Remove Custom Items
Custom toolbar items and submenus have a Remove button. Click it to delete the element. Built-in WordPress items cannot be removed here; use the Hide in Toolbar toggle or role hiding instead.
Save, Expand, and Reset
- Save: the Save (⌘+S) button in the top corner saves all changes. The keyboard shortcut is ⌘+S on macOS and Ctrl+S on Windows.
- Expand All / Collapse All: toggles all submenu accordions open or closed.
- Reset All: restores the default toolbar and removes all custom order, renames, hides, custom items, and submenus.
Verify It Works
After saving, open the toolbar on the frontend and backend of your site and confirm:
- The reordered items appear in the order you set.
- Renamed titles and custom icons show correctly.
- Custom toolbar items and submenus are visible.
- Items you moved to the right side appear on the right of the toolbar.
- If you hid an item from a role, log in as a user of that role and confirm the item is missing.
If a change does not appear, clear any admin or page cache, then reload.
Examples
Example 1: Clean Up the Toolbar for a Client
A client sees a cluttered toolbar. Drag the items you want to keep to the top, rename verbose item titles to short labels, and use Hide in Toolbar on items the client does not need. Save. The toolbar now shows only the actions the client uses.
Example 2: Add a Quick Link to a Custom Page
Add a custom toolbar item with the title Reports and a Target URL pointing to your admin reports page. Pick a chart icon. Add a submenu under it for a second report page. Save. The toolbar now has a Reports menu with both links.
Example 3: Move a Button to the Right Side
You want the Howdy menu on the right but a custom item on the left. Drag the custom item above the Right Side marker and the Howdy menu below it. Save. The custom item appears on the left of the toolbar and the account menu stays on the right.

Add your first comment to this post