




What Is the Checkout Product Selector?
By default, the WooCommerce checkout page only shows the items already in the cart, and changing what a customer buys means leaving checkout. The Classic Monks Enable Checkout Product Selector feature adds a dropdown directly on the checkout page. A customer opens the dropdown, picks a different eligible product, and the selection:
- Clears the current cart and adds the newly selected product (it replaces, not appends).
- Refreshes the checkout totals through AJAX without reloading the page.
This is a switcher, not an add-on. Its purpose is to let a customer choose which product they finalize the order with in one step, rather than navigating back to the catalog. The current cart product is automatically pre-selected in the dropdown when it is eligible.
Why You Need It
The checkout page is where customers convert, and forcing them to abandon it to browse or edit is a conversion killer:
- Product-swap convenience. A customer who wants to change size tier, plan, or bundle before paying can do it right on the checkout with one click.
- Single-product purchase flows. For stores that sell one thing per order (configurable plans, made-to-order items), a checkout-page selector replaces a clunky add-to-cart edit flow.
- GTM-owned checkout. Merchants who want a tightly controlled one-product checkout get a simple, AJAX-driven way to swap the order item.
- Reduced abandonment. Any time you remove the need to leave checkout, you reduce the chance the customer abandons.
The feature is opt-in and off by default, so it only appears on stores that explicitly configure it.
How to Add a Product Selector to the WooCommerce Checkout in WordPress
Step 1: Enable the Feature
- Open Classic Monks in your WordPress admin sidebar.
- Open the WooCommerce tab.
- Open the One Click Checkout subtab.
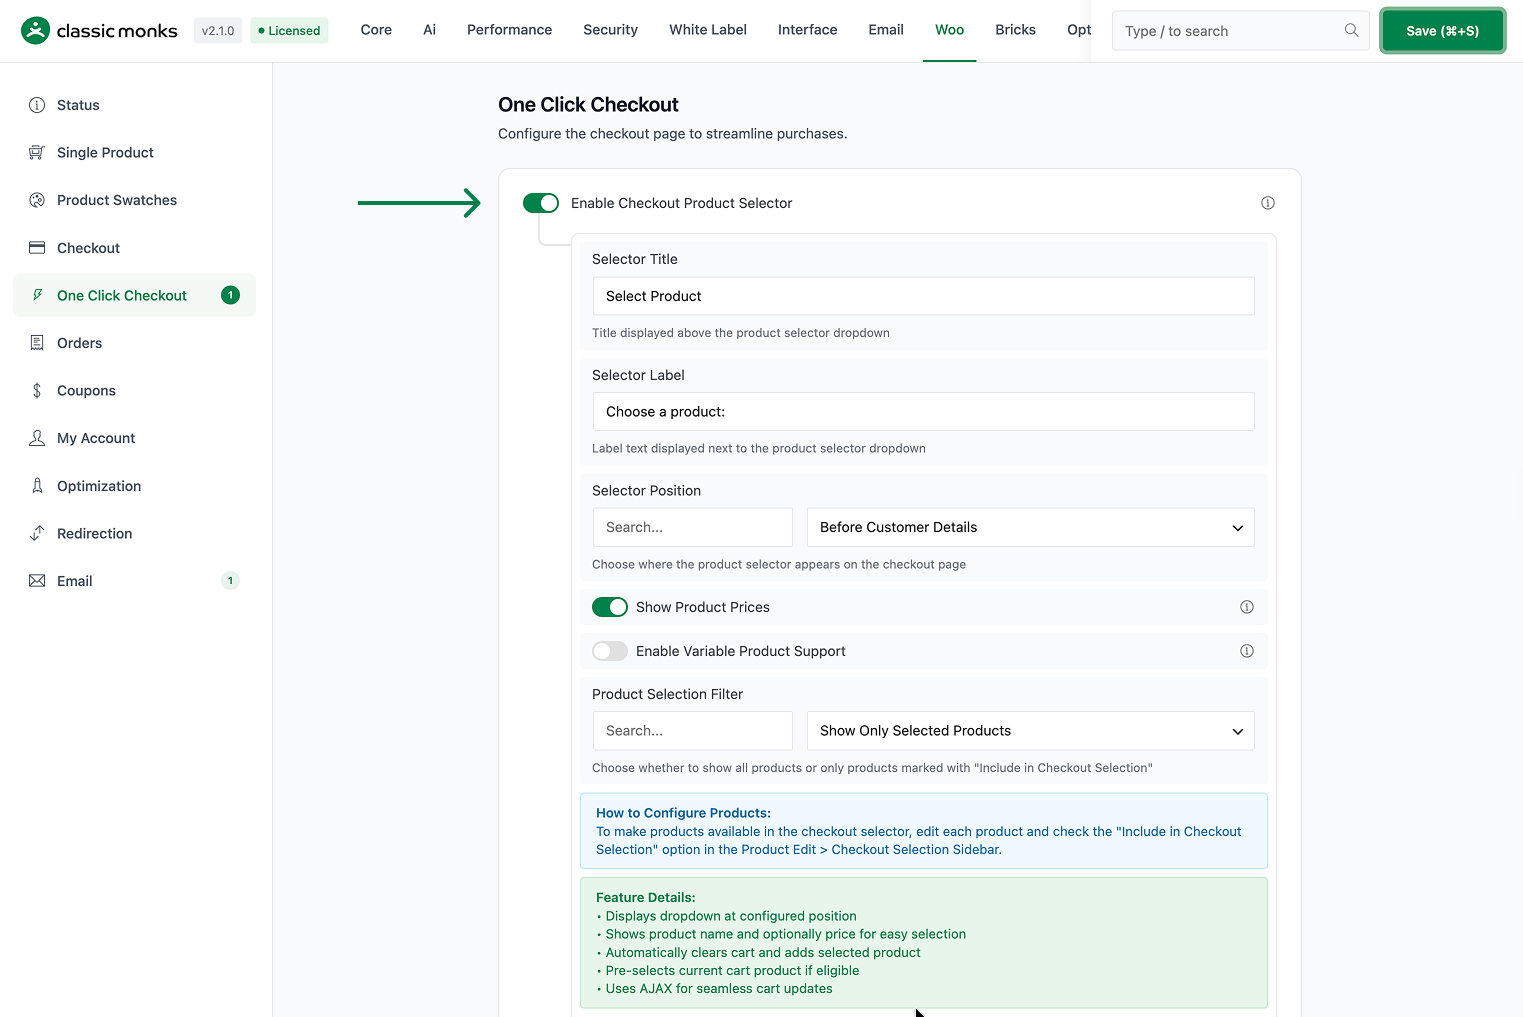
- Toggle on Enable Checkout Product Selector. The nested options expand below the toggle.
Step 2: Configure the Selector
- Selector Title (default
Select Product) is the heading shown above the dropdown. - Selector Label (default
Choose a product:) is the label next to the dropdown. - Selector Position places the selector Before Customer Details, After Customer Details, or Before Payment Section.
- Show Product Prices (On by default) appends each product’s price to its option text.
- Enable Variable Product Support (Off by default) expands variable products into their individual, in-stock variations, each shown with its attributes (for example, “T-Shirt (Size: Large, Color: Blue)”).
- Product Selection Filter controls which products appear (see Step 3).
Step 3: Choose Which Products Appear
Set Product Selection Filter to one of two modes:
- Show Only Selected Products (default): only products marked eligible appear. Enable this on each product by editing it and checking Include in Checkout Selection in the Checkout Selection sidebar metabox. When this mode is active, that setting is required for a product to appear.
- Show All Published Products: every published, purchasable, in-stock product is available in the selector. The Include in Checkout Selection setting is ignored.
Step 4: Save Changes
Click Save Changes in the Classic Monks settings toolbar.
Step 5: Test
Visit the checkout page with a product in your cart. The selector shows at the configured position with the current product pre-selected. Pick a different (or same) product and confirm the checkout totals update through AJAX without a full page reload.
Configuration Options
| Option | Behavior | Default |
|---|---|---|
| Enable Checkout Product Selector | Master toggle for the whole feature. | Off |
| Selector Title | Heading shown above the dropdown. | Select Product |
| Selector Label | Label text next to the dropdown. | Choose a product: |
| Selector Position | Where the selector renders: Before Customer Details, After Customer Details, or Before Payment Section. | Before Customer Details |
| Show Product Prices | Appends each product’s price to its option text. | On |
| Enable Variable Product Support | Expands variable products into individual, in-stock variation options with their attribute labels. | Off |
| Product Selection Filter | Show Only Selected Products (requires the per-product checkbox) or Show All Published Products. | Show Only Selected Products |
What Gets Affected
- The checkout page: a product selector dropdown appears at the configured position
- Cart contents: selecting a product clears the existing cart and adds the newly selected one (quantity 1)
- Checkout totals: updated via AJAX (
update_checkout) without reloading the page - The selected-product state: the current eligible cart product is pre-selected in the dropdown
- Per-product eligibility: the Include in Checkout Selection checkbox (only enforced in “selected only” mode)
What Does NOT Get Affected
- The standard product catalog, product pages, and Add to Cart buttons (unchanged)
- The cart page display and normal multi-product cart behavior
- Eligible product rules: only published, purchasable, in-stock products are available regardless of filter mode
- Other checkout fields and payment sections (the selector is an additive widget at the chosen position)
Advanced Options (Developers)
The feature registers its hooks in functions/woocommerce/one-click-checkout/checkout-product-selector.php:
Admin hooks:
add_action( 'add_meta_boxes', array( $this, 'add_checkout_selection_metabox' ) );
add_action( 'woocommerce_process_product_meta', array( $this, 'save_checkout_selection_field' ) );add_meta_boxesadds the Checkout Selection sidebar metabox to the product edit screen with the Include in Checkout Selection checkbox.woocommerce_process_product_metasaves that checkbox value to the_include_in_checkout_selectionpost meta.
Display hook (position-dependent):
before_customer→woocommerce_checkout_before_customer_detailsafter_customer→woocommerce_checkout_after_customer_detailsbefore_payment→woocommerce_checkout_before_order_review
The selected position maps to the matching WooCommerce checkout action, on which add_product_selector() renders the dropdown (only when is_checkout() is true and eligible products exist).
Scripts and AJAX:
add_action( 'wp_enqueue_scripts', array( $this, 'enqueue_checkout_scripts' ) );
add_action( 'wp_ajax_wc_checkout_product_selector', array( $this, 'handle_product_selection' ) );
add_action( 'wp_ajax_nopriv_wc_checkout_product_selector', array( $this, 'handle_product_selection' ) );wp_enqueue_scriptsinjects the inline script and styles when on the checkout page with eligible products.wp_ajax_/wp_ajax_nopriv_onwc_checkout_product_selectorpowershandle_product_selection(), which verifies a nonce, clears the cart, and adds the selected product or variation. The AJAX handler runs for both logged-in and guest customers.
The selection AJAX passes an option_value of the product ID, or parentID:variationID for variations when variation support is enabled.
Common Use Cases
Configurable plan and tier purchases. A customer on a SaaS or membership checkout wants to move from monthly to annual, or from Basic to Pro. The selector lets them swap the exact order item on the checkout page without hunting through the catalog.
Made-to-order and single-item stores. Stores structured around one custom product per order can use the checkout selector as the final product chooser, replacing a multi-step cart flow with a single dropdown.
Gift and bundle one-offs. Mark a shortlist of gift options or bundle variants as eligible, show them on checkout, and let the shopper decide which one to pay for at the final step.
Price-transparent checkout. With Show Product Prices on and Show All Published Products, customers can compare eligible products by price directly on the checkout page before choosing.
Variation-aware checkout. With Enable Variable Product Support, a customer picks an exact size-and-color variation from the checkout dropdown, so the order item is fully specified before payment.

Add your first comment to this post